
Quick & Fluffy Bread in 20 Minutes Recipe for Busy Bakers
Quick homemade bread can turn an ordinary afternoon into a delightful culinary adventure.
Kneading soft dough becomes surprisingly simple with this lightning-fast technique.
Warm kitchen aromas will soon fill your space with comforting scents.
Anyone can master this straightforward method without advanced baking skills.
Simple ingredients from your pantry create magic in mere moments.
Minimal effort delivers maximum satisfaction, promising a golden, crusty loaf that rivals professional bakery offerings.
You’ll feel like a kitchen champion after crafting this speedy, irresistible bread.
Why Bread in 20 Minutes Is So Convenient
Ingredients Needed for Bread in 20 Minutes
Quick Bread Ingredients:
Main Ingredients:Leavening and Seasoning:How to Make Bread in 20 Minutes Fast
Step 1: Prepare Baking Space
Grab a baking sheet and line it with parchment paper. Preheat your oven to a toasty 375°F (190°C) so it’s ready for your bread adventure.
Step 2: Create Dry Mixture
In a roomy mixing bowl, toss together these dry ingredients:Whisk them until they’re perfectly blended and free of lumps.
Step 3: Transform Into Dough
Pour in your liquid ingredients:Stir everything together with a wooden spoon or spatula until a soft, shaggy dough emerges.
Don’t worry about making it perfect – rustic is beautiful!
Step 4: Shape Your Bread
Gently knead the dough for just a minute.
This helps everything come together without overworking it. Form the dough into a round or oval shape that looks inviting and rustic.
Step 5: Bake To Golden Perfection
Transfer your shaped dough onto the prepared baking sheet. Slide it into the preheated oven and bake for 15-18 minutes.
You’ll know it’s done when the top turns a gorgeous golden brown and a toothpick comes out clean when inserted.
Step 6: Enjoy Warm Bread
Let the bread cool for a few minutes.
Slice, slather with butter or your favorite spread, and savor the warm, freshly baked goodness.
Tips for Perfect Quick Bread Every Time
Variations to Try on Bread in 20 Minutes
What Pairs Well with Quick Bread in 20 Minutes
Blend extra virgin olive oil with roasted garlic, fresh herbs, and a pinch of sea salt for a luxurious companion to this quick bread.
Brew a light, aromatic green tea that complements the bread’s subtle olive oil notes and provides a refreshing contrast.
Top the warm bread with diced ripe tomatoes, fresh basil, and a drizzle of balsamic glaze for a Mediterranean-inspired side dish.
Whip together softened butter, local honey, and orange zest to create a bright, sweet topping that enhances the bread’s simple flavor profile.
How to Store Quick Bread in 20 Minutes
FAQs
Yes, you can substitute all-purpose flour with whole wheat, gluten-free, or spelt flour. Each type might slightly change the texture and flavor of the bread.
No, baking powder is crucial for helping the bread rise and creating a light, fluffy texture. Without it, the bread would be dense and flat.
Check for a golden-brown color on the outside and use a toothpick – if it comes out clean with no wet dough, the bread is ready. The bread should also sound hollow when tapped on the bottom.
Print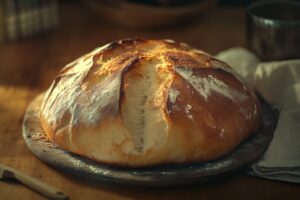
Bread In 20 Minutes Recipe
- Total Time: 28 minutes
- Yield: 4 1x
Description
Quick and easy bread emerges from your kitchen with minimal effort, promising warm, aromatic slices in mere moments. Homemade comfort meets convenience, inviting you to savor each delightful bite without complex techniques or long waiting periods.
Ingredients
Main Ingredients:
- 2 cups (480 milliliters) all-purpose flour
- 3/4 cup (180 milliliters) milk (or water for dairy-free)
Leavening and Seasoning:
- 1 tablespoon baking powder
- 1/2 teaspoon salt
- 1 tablespoon sugar (optional)
Fats:
- 2 tablespoons olive oil or melted butter
Instructions
- Prepare the oven at 375F (190C) and arrange a parchment-lined baking sheet.
- Blend flour, baking powder, salt, and sugar in a mixing bowl to create a uniform dry mixture.
- Incorporate milk and olive oil into the dry ingredients, stirring gently until a cohesive dough develops.
- Gently manipulate the dough with light kneading, then craft into a rustic round or oval shape.
- Transfer the shaped dough onto the prepared baking sheet, positioning it centrally.
- Slide the baking sheet into the preheated oven and bake for 15-18 minutes, monitoring until the surface turns a rich golden brown.
- Verify doneness by inserting a toothpick; it should emerge clean without any raw dough residue.
- Allow the bread to rest and slightly cool for a few minutes, then slice and serve while warm.
- Complement the bread with softened butter, fruity jam, or your preferred spread for an enhanced culinary experience.
Notes
- Swap out all-purpose flour with whole wheat or gluten-free alternatives for dietary needs and different nutritional profiles.
- Add herbs like rosemary, thyme, or dried oregano to the dry ingredients for extra flavor and aromatic complexity.
- For a richer texture, replace milk with buttermilk or yogurt to enhance softness and tanginess.
- Brush the bread’s surface with melted butter or egg wash before baking to achieve a golden, glossy crust that looks professionally baked.
- Prep Time: 10 minutes
- Cook Time: 18 minutes
- Category: Breakfast, Snacks
- Method: Baking
- Cuisine: American
Nutrition
- Serving Size: 4
- Calories: 193 kcal
- Sugar: 2 g
- Sodium: 297 mg
- Fat: 6 g
- Saturated Fat: 1 g
- Unsaturated Fat: 5 g
- Trans Fat: 0 g
- Carbohydrates: 30 g
- Fiber: 1 g
- Protein: 4 g
- Cholesterol: 3 mg
Mike Reynolds
Founder & Recipe Developer
Expertise
Farm-to-table cuisine, Seasonal recipe development, Sustainable cooking techniques, Food photography
Education
Asheville-Buncombe Technical Community College (A-B Tech)
Associate Degree in Culinary Arts
Mike studied culinary arts with a strong focus on farm-to-table principles and sustainable cooking. His training emphasized the importance of fresh, local ingredients and environmentally responsible practices in the kitchen.
Mike’s food journey began deep in the Blue Ridge Mountains, where weekends at farmers’ markets and home-cooked meals sparked a lifelong obsession with simple, seasonal eating.
After earning his Associate Degree in Culinary Arts from Asheville-Buncombe Technical Community College, he set out to bring farm-to-table cooking into everyday kitchens, without the fuss.
Mike’s philosophy is all about keeping it fresh, unfussy, and full of heart. When he’s not crafting new single-serving recipes, he’s hiking mountain trails, chatting with local farmers, or experimenting with wild ingredients in his backyard kitchen.