
Easy Bunny Butt Oreo Balls Recipe: Hop into Sweet Springtime Fun
Sweet-toothed dessert lovers will adore these whimsical bunny butt Oreo balls that bring playful charm to any gathering.
Crumbled cookies blend seamlessly with cream cheese, creating irresistible bite-sized treats.
Cute and quirky, these little desserts spark instant conversation and delighted smiles.
Kids and adults alike will giggle at the adorable bunny-inspired design.
Soft, creamy centers wrapped in smooth chocolate make these treats impossible to resist.
Minimal ingredients and simple steps mean you can craft these delightful morsels in minutes.
Roll up your sleeves and let’s make some adorably tasty bunny butt Oreo balls that will wow everyone at the party!
FAQs
Yes, you can substitute Oreos with graham crackers or any similar chocolate sandwich cookie for a similar texture and taste.
Lightly grease your hands with cooking spray or wear disposable gloves to make rolling easier and prevent sticking.
Use a double boiler or microwave in short 15-second intervals, stirring between each interval to ensure smooth melting without burning.
Absolutely! You can prepare them up to 3 days in advance and store them in an airtight container in the refrigerator until ready to serve.
What Makes Bunny Butt Oreo Balls So Fun
Ingredients Needed for Bunny Butt Oreo Balls
Base Ingredients:Coating and Decorative Ingredients:Finishing Touches:How to Make Bunny Butt Oreo Balls Easily
Step 1: Crush and Blend Oreo Cookies
Toss Oreo cookies into a food processor and pulse until you create fine, sandy crumbs. Add softened cream cheese and mix thoroughly until the mixture becomes a smooth, uniform consistency that holds together when pressed.
Step 2: Roll Perfect Bite-Sized Spheres
Scoop small portions of the Oreo mixture and roll them between your palms to create uniform round balls. Each ball should be about the size of a golf ball.
Gently place these delightful spheres onto a parchment-lined baking sheet.
Step 3: Chill the Oreo Balls
Slide the baking sheet into the refrigerator and let the Oreo balls cool and firm up for about 30 minutes.
This chilling process helps them maintain their shape during the chocolate coating.
Step 4: Chocolate Dunking Technique
Ingredients for coating:Melt the white chocolate or candy melts in a microwave-safe bowl, stirring frequently to prevent burning.
Carefully dip each chilled Oreo ball into the melted chocolate, ensuring complete coverage. Gently tap off excess chocolate and place back on the parchment paper.
Step 5: Sprinkle Coconut Topping
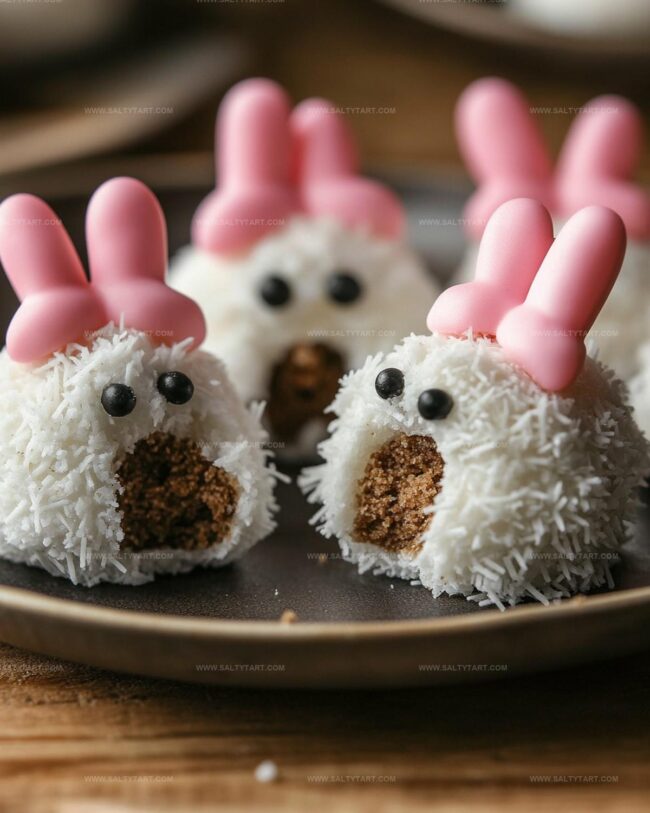
While the chocolate is still wet, generously sprinkle shredded coconut over the coated balls to create a fluffy bunny-like texture.
Step 6: Create Bunny Details
Ingredients for decorating:Attach a mini marshmallow to the back of each ball to represent the bunny tail.
Use pink candy melts or colored candies to create tiny feet. Pipe delicate white and pink icing to draw adorable paw details and facial features.
Step 7: Final Chilling and Serving
Return the decorated Bunny Butt Oreo Balls to the refrigerator. Allow the decorations to set completely, which typically takes about 15-20 minutes.
These cute treats are now ready to delight and surprise your friends and family!
Tips for Perfect Bunny Butt Oreo Balls
Creative Spins on Bunny Butt Oreo Balls
Best Pairings for Bunny Butt Oreo Balls
Guidelines for Storing Bunny Butt Oreo Balls
Print
Bunny Butt Oreo Balls Recipe
- Total Time: 45 minutes
- Yield: 36 1x
Description
Whimsical bunny butt oreo balls bring playful Easter charm to dessert tables with adorable cookie treats. Sweet cream cheese and crushed oreos combine in cute bite-sized confections that delight children and adults alike.
Ingredients
Main Ingredients:
- 36 Oreo cookies
- 8 ounces (226 grams) cream cheese
- 12 ounces (340 grams) white chocolate or candy melts
Decorative Ingredients:
- 1/2 cup (40 grams) shredded coconut
- 12 mini marshmallows
- 24 pink candy melts or pink M&Ms
Finishing Ingredients:
- White decorating icing
- Pink decorating icing
Instructions
- Pulverize Oreo cookies into fine, uniform crumbs using a food processor, ensuring no large chunks remain.
- Incorporate softened cream cheese into the cookie crumbs, mixing thoroughly until a cohesive, moldable texture develops.
- Gently form the mixture into compact, rounded spheres approximately one inch in diameter, handling with light touch to maintain shape.
- Arrange the formed balls on a parchment-lined tray, then refrigerate for 30 minutes to firm and stabilize their structure.
- Carefully melt white chocolate or candy melts at low temperature, stirring consistently to prevent scorching.
- Delicately immerse each chilled Oreo ball into the melted chocolate, ensuring complete and even coverage.
- Position the chocolate-drenched spheres back onto the parchment, immediately sprinkling shredded coconut over the surface before chocolate solidifies.
- Affix a mini marshmallow to the rear of each ball, creating the distinctive bunny tail effect.
- Craft bunny feet using pink candy melts or colorful M&Ms, strategically placing them to enhance the playful design.
- Utilize white and pink icing to meticulously pipe delicate paw details, adding whimsical character to each treat.
- Allow decorations to completely set at room temperature, ensuring intricate designs remain intact.
- Refrigerate until serving, maintaining their adorable appearance and optimal texture.
Notes
- Chill the mixture before shaping to prevent sticky hands and ensure smooth, perfectly round Oreo balls that hold their shape beautifully.
- Use room temperature cream cheese for smoother mixing and easier blending with Oreo crumbs, creating a consistent texture throughout the mixture.
- Melt white chocolate slowly and carefully to prevent seizing, using short microwave bursts or a double boiler for the smoothest coating possible.
- For gluten-free options, swap regular Oreos with gluten-free chocolate sandwich cookies, making this treat accessible to more people with dietary restrictions.
- Prep Time: 30 minutes
- Cook Time: 15 minutes
- Category: Snacks, Desserts
- Method: Refrigerating
- Cuisine: American
Nutrition
- Serving Size: 36
- Calories: 112
- Sugar: 9 g
- Sodium: 45 mg
- Fat: 6 g
- Saturated Fat: 3.5 g
- Unsaturated Fat: 2.5 g
- Trans Fat: 0 g
- Carbohydrates: 14 g
- Fiber: 0.5 g
- Protein: 1.5 g
- Cholesterol: 10 mg
Jess Martinez
Contributing Recipe Writer & Nutrition Consultant
Expertise
Southwestern and Latin American cooking, Nutritional analysis and healthy recipe planning, Cultural food traditions, Modifying traditional dishes for better health
Education
Santa Fe Community College
Certificate in Culinary Arts
Focused on mastering the flavors and cooking methods of traditional Southwestern cuisine.
Jess’s love for bold, homegrown flavors led her straight into the world of Southwestern cooking and cultural nutrition.
After completing her Certificate in Culinary Arts at Santa Fe Community College, she made it her mission to show that good-for-you food can still taste incredible.
At saltytart.com, Jess shares vibrant, health-conscious recipes with roots in tradition but a fresh, modern twist. When she’s not testing new recipes, you’ll find her at local growers’ markets, tending her herb garden, or digging into food history books.