Cheesy Garlic Bliss Bombs: The Irresistible Homemade Recipe
Who doesn’t crave a delightful cheesy garlic bliss bombs burst of flavor that melts in your mouth?
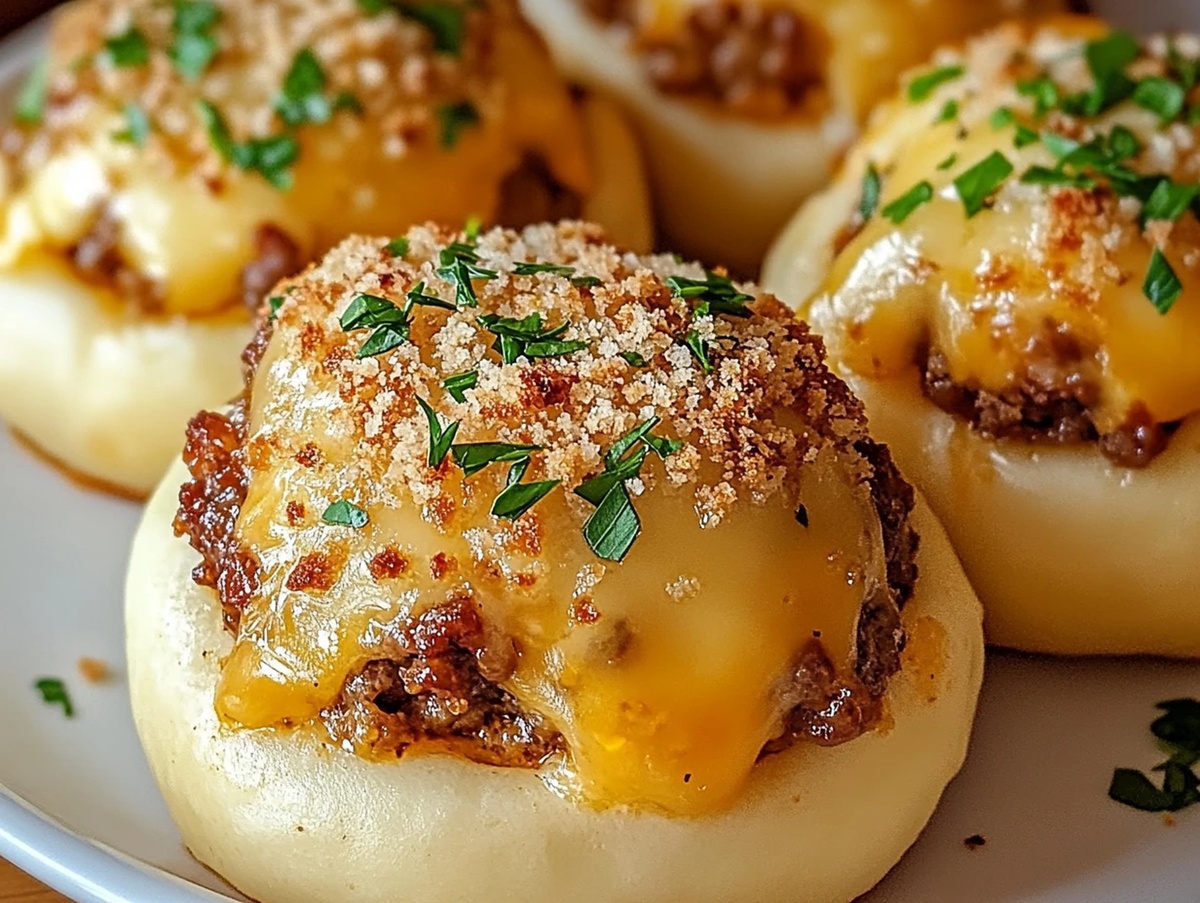
Crispy golden exteriors hide creamy, garlicky goodness waiting to surprise you.
Each bite promises a delectable adventure through warm, cheesy landscapes.
Small yet mighty, these little bombs pack an incredible punch of comfort and excitement.
Simple ingredients combine to create something magical that feels both familiar and extraordinary.
Kitchen adventures like these connect us through shared moments of pure culinary joy.
You’ll want to make these again and again, sharing happiness with every delicious morsel.
Cheesy Garlic Bliss Bombs Bursting With Flavor
Ingredients To Prepare Cheesy Garlic Bliss Bombs
Main Ingredients:Flavor Enhancers:Finishing Touches:Optional Dipping Sauces:How To Make Cheesy Garlic Bliss Bombs
Step 1: Brown the Savory Beef Mixture
In a skillet over medium heat, cook ground beef until it breaks into delicious crumbles. Drain away any excess grease.
Toss in minced garlic and let it dance around the pan for 1-2 minutes, releasing its aromatic magic. Remove from heat and let the mixture cool down slightly.
Step 2: Create Flavor-Packed Pouches
Gently flatten each biscuit dough into a wide circle about the size of your palm. Spoon a small portion of the beef mixture right in the center of each dough circle.
Add your cheese treasures:Carefully fold the dough around the filling, pinching the edges tightly to create a secure seal. Roll the dough gently into a perfect little ball.
Step 3: Prepare for Baking
Crank up the oven to 375°F (190°C). Line a baking sheet with parchment paper.
Arrange the stuffed dough balls seam-side down with some breathing room between them. Brush each bomb with melted butter and sprinkle chopped parsley for an extra flavor kick.
Step 4: Bake and Devour
Slide the baking sheet into the oven and bake for 15-18 minutes. Watch for a gorgeous golden-brown color and a beautiful puffy appearance.
Let the bombs cool for a few moments. Serve with your favorite dipping sauces like marinara, ranch, or BBQ for an epic flavor explosion!
Pro Tips To Nail Cheesy Garlic Bliss Bombs
Variations To Change Up Cheesy Garlic Bliss Bombs
Pairing Ideas To Enjoy With Cheesy Garlic Bliss Bombs
Complement the rich, savory beef and cheesy flavors with a hoppy IPA or crisp amber ale that cuts through the richness.
Toss a light arugula salad with lemon vinaigrette to balance the heavy, cheesy bombs and provide a zesty, refreshing contrast.
Serve alongside a trio of dipping sauces – tangy marinara for classic Italian flair, creamy ranch for cooling comfort, and smoky BBQ for bold flavor adventure.
Select a chilled Sauvignon Blanc or Pinot Grigio to refresh the palate and cut through the rich, garlicky beef and melted cheese bombs.
Storage Advice To Keep Cheesy Garlic Bliss Bombs Fresh
FAQs
You’ll need ground beef, biscuit dough, cheddar cheese, Parmesan cheese, minced garlic, melted butter, and chopped parsley. These simple ingredients combine to create a delicious, savory snack.
Absolutely! Ground turkey, chicken, or even vegetarian crumbles work great as alternatives to ground beef. Just ensure the meat is fully cooked and seasoned well before stuffing into the bombs.
Yes! Kids typically love these cheesy, handheld treats. The mild flavors and easy-to-eat format make them perfect for children’s meals or parties. Plus, they’re fun to make together.
Print
Cheesy Garlic Bliss Bombs Recipe
- Total Time: 38 minutes
- Yield: 8 1x
Description
Cheesy garlic bliss bombs elevate comfort food with their irresistible blend of melted cheese and savory garlic. Crispy on the outside and gooey inside, these delightful bites promise a flavor explosion that will transport your taste buds to culinary paradise.
Ingredients
Primary Protein and Cheese:
- 1 pound ground beef
- 1 cup cheddar cheese, cubed
- 1/2 cup Parmesan cheese, diced
Dough and Base:
- 1 can (16.3 ounces) biscuit dough (Pillsbury Grands)
Seasonings and Finishing:
- 2 cloves garlic, minced
- 2 tablespoons butter, melted
- 1 tablespoon parsley, chopped (optional for garnish)
Instructions
- Create a savory beef mixture by browning ground beef in a skillet over medium heat, breaking it into fine crumbles. Drain excess fat and incorporate minced garlic, sautéing for 1-2 minutes until aromatic. Allow the mixture to cool slightly.
- Gently flatten each biscuit dough into a thin 4-inch circular shape. Position a small portion of the cooled beef mixture at the center of each dough circle.
- Add a single cube of cheddar cheese and a small fragment of Parmesan directly onto the beef filling.
- Carefully encase the filling by folding the dough edges, meticulously pinching and sealing to prevent leakage. Softly roll into compact spherical shapes.
- Preheat the oven to 375F (190C). Arrange the prepared bombs with sealed side facing downward on a parchment-lined baking sheet.
- Generously brush each bomb with melted butter and sprinkle with freshly chopped parsley for enhanced flavor profile.
- Bake for 15-18 minutes, monitoring until the bombs transform into a golden-brown, puffy texture.
- Remove from oven and allow brief cooling. Serve alongside preferred dipping sauces like marinara, ranch, or BBQ for an elevated culinary experience.
Notes
- Customize the beef filling by swapping ground beef with ground turkey, chicken, or plant-based crumbles for a lighter protein option.
- Ensure biscuit dough is cold when working with it to prevent sticking and make sealing easier.
- Add a pinch of red pepper flakes or cayenne to the beef mixture for a subtle kick of heat that complements the cheesy interior.
- Create a make-ahead strategy by assembling the bombs and freezing them uncooked, then baking directly from frozen with an extra 5-7 minutes of cooking time.
- Prep Time: 20 minutes
- Cook Time: 18 minutes
- Category: Appetizer, Snacks
- Method: Baking
- Cuisine: American
Nutrition
- Serving Size: 8
- Calories: 334 kcal
- Sugar: 1 g
- Sodium: 574 mg
- Fat: 23 g
- Saturated Fat: 10 g
- Unsaturated Fat: 11 g
- Trans Fat: 0.5 g
- Carbohydrates: 17 g
- Fiber: 1 g
- Protein: 18 g
- Cholesterol: 64 mg
Mike Reynolds
Founder & Recipe Developer
Expertise
Farm-to-table cuisine, Seasonal recipe development, Sustainable cooking techniques, Food photography
Education
Asheville-Buncombe Technical Community College (A-B Tech)
Associate Degree in Culinary Arts
Mike studied culinary arts with a strong focus on farm-to-table principles and sustainable cooking. His training emphasized the importance of fresh, local ingredients and environmentally responsible practices in the kitchen.
Mike’s food journey began deep in the Blue Ridge Mountains, where weekends at farmers’ markets and home-cooked meals sparked a lifelong obsession with simple, seasonal eating.
After earning his Associate Degree in Culinary Arts from Asheville-Buncombe Technical Community College, he set out to bring farm-to-table cooking into everyday kitchens, without the fuss.
Mike’s philosophy is all about keeping it fresh, unfussy, and full of heart. When he’s not crafting new single-serving recipes, he’s hiking mountain trails, chatting with local farmers, or experimenting with wild ingredients in his backyard kitchen.