Magical Chocolate Pistachio Cream Thumbprints Recipe for Sweet Joy
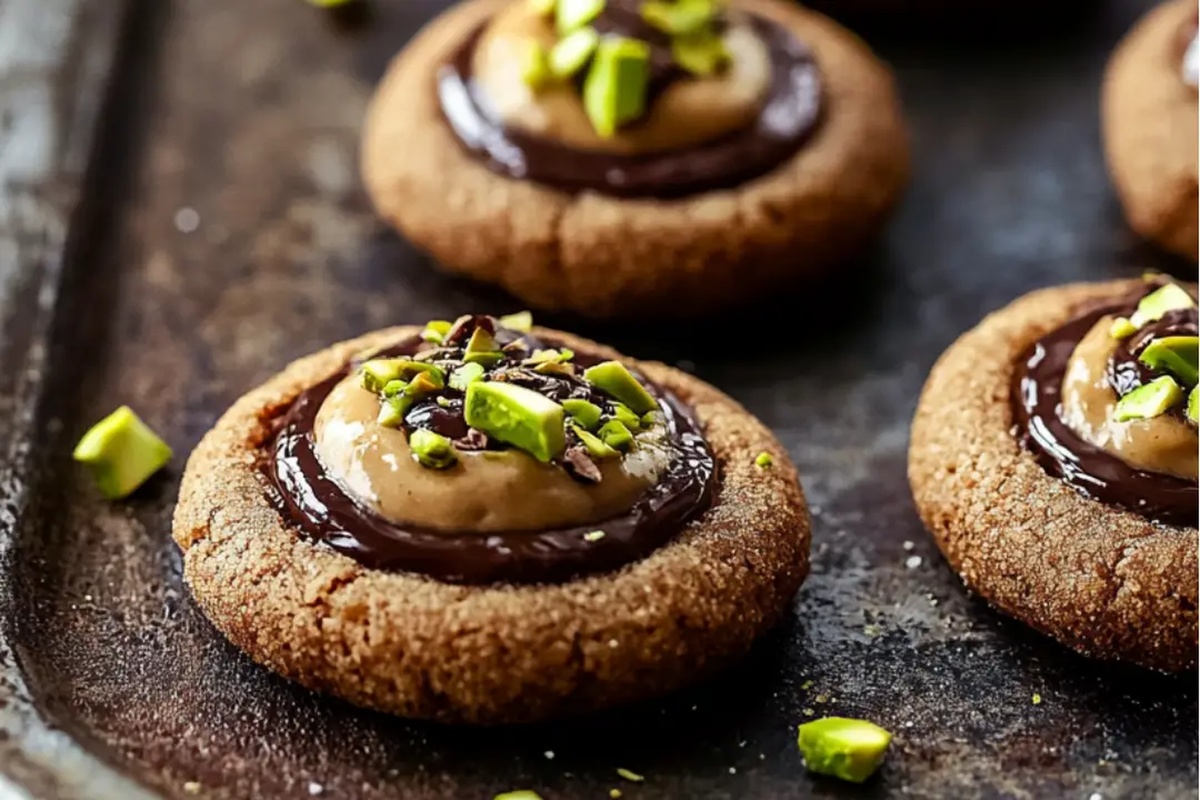
Delicate and buttery, these chocolate pistachio cream thumbprints blend rich flavors in every delightful bite.
Nutty pistachios dance alongside smooth chocolate, creating a heavenly combination that melts in your mouth.
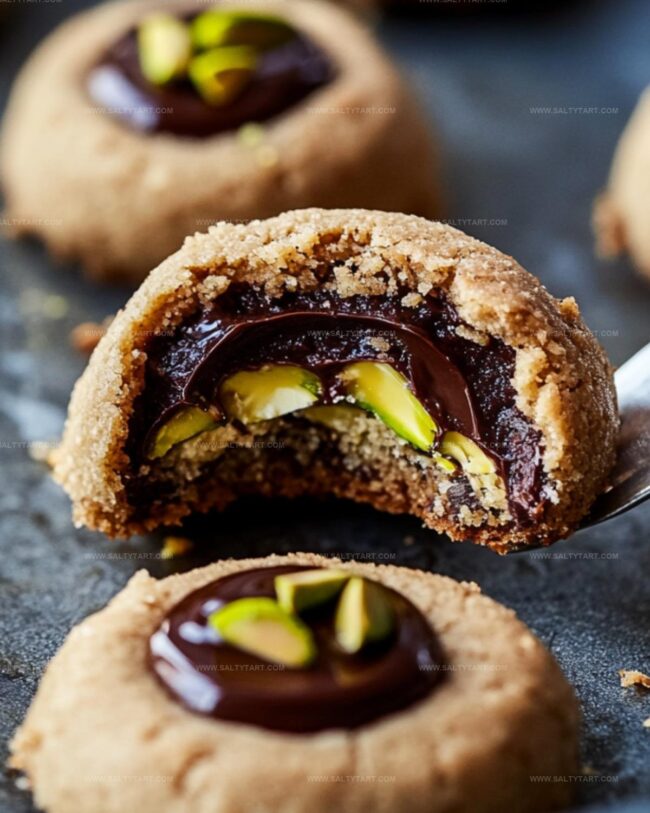
The delicate cookies feature a perfectly pressed center filled with luxurious cream.
Crisp edges complement the soft, luscious filling that makes these thumbprints irresistible.
Each bite promises a delectable balance of textures and tastes that will delight dessert enthusiasts.
Bakers of all skill levels can master this elegant treat with simple ingredients and straightforward techniques.
Prepare to indulge in a cookie that transforms an ordinary moment into a sweet celebration.
Why Chocolate Pistachio Thumbprints Stand Out
What’s Needed for Pistachio Cream Thumbprints
Cookie Base Ingredients:Wet Ingredients:Filling and Topping Ingredients:Steps for Making Chocolate Pistachio Thumbprints
Step 1: Mix Dry Cookie Ingredients
Grab a medium bowl and whisk together flour, cocoa powder, baking powder, and salt until perfectly blended.
Step 2: Cream Butter and Sugar
In a large bowl, use an electric mixer to cream butter and sugar until the mixture becomes light and fluffy, which takes about 2-3 minutes.
Step 3: Add Wet Ingredients
Blend in egg and vanilla extract, mixing until everything is fully incorporated and smooth.
Step 4: Combine Wet and Dry Mixtures
Gradually add dry ingredients to wet ingredients, stirring until just combined.
Don’t overmix the dough.
Step 5: Shape Cookie Balls
Roll the dough into small 1-inch balls.
Step 6: Coat with Pistachios
Roll each dough ball in finely chopped pistachios, ensuring an even coating.
Step 7: Prepare for Baking
Place coated dough balls on a prepared baking sheet, spacing them about 2 inches apart.
Step 8: Create Thumbprint
Use your thumb or the back of a spoon to make a gentle indentation in the center of each cookie.
Step 9: Bake Cookies
Bake in a preheated 350F (175C) oven for 8-10 minutes, or until cookie edges are set.
Step 10: Cool Cookies
Let cookies rest on the baking sheet for 5 minutes, then transfer to a wire rack to cool completely.
Step 11: Prepare Pistachio Cream
In a medium bowl, beat cream cheese, powdered sugar, heavy cream, and pistachio paste until smooth and creamy.
Step 12: Fill Cookies
Spoon or pipe the pistachio cream into the center of each cooled cookie.
Step 13: Add Final Garnish
Sprinkle additional chopped pistachios over the filled cookies for extra crunch and flavor.
Step 14: Serve and Enjoy
Allow the filling to set for a few minutes, then serve these delightful chocolate pistachio cream thumbprints.
Notes for Buttery Pistachio Thumbprint Cookies
Creative Ways to Style Pistachio Thumbprints
Sips and Sweets to Pair With Thumbprints
Storing Thumbprint Cookies Soft and Tasty
FAQs
You can substitute pistachios with almonds or pecans, but this will change the signature flavor of the cookie. Pistachios provide a unique taste that complements the chocolate base.
Ensure your dough is not too dry by measuring ingredients precisely. When making the thumbprint, press gently and create the indentation while the dough is still warm and soft.
Pistachio paste adds authentic flavor, but you can substitute with almond extract or finely ground pistachios mixed into the cream cheese filling. The goal is to maintain a nutty essence in the cream.
Print
Chocolate Pistachio Cream Thumbprints Recipe
- Total Time: 35 minutes
- Yield: 24 1x
Description
Delightful chocolate pistachio cream thumbprints showcase a perfect blend of rich chocolate and nutty pistachios in one irresistible cookie. Crumbly shortbread meets silky cream filling, creating a sophisticated treat that will transport taste buds to culinary bliss.
Ingredients
Main Ingredients:
- 1 cup (150 grams) all-purpose flour
- 1/2 cup (113 grams) unsalted butter, softened
- 1/2 cup (100 grams) granulated sugar
- 1 large egg
Chocolate and Nut Components:
- 1/4 cup (25 grams) unsweetened cocoa powder
- 1/2 cup (60 grams) finely chopped pistachios
Seasoning and Flavoring:
- 1/2 teaspoon baking powder
- 1/4 teaspoon salt
- 1 teaspoon vanilla extract
Instructions
- Preheat the oven to 350F (175C) and prepare a baking sheet with parchment paper or silicone mat.
- Combine flour, cocoa powder, baking powder, and salt in a medium mixing bowl.
- Cream butter and sugar using an electric mixer until light and fluffy, approximately 2-3 minutes.
- Incorporate egg and vanilla extract into the butter mixture until fully blended.
- Gradually fold dry ingredients into the wet mixture, mixing until just combined.
- Form dough into 1-inch uniform balls.
- Coat each dough ball completely with finely chopped pistachios.
- Arrange pistachio-coated balls on the prepared baking sheet, maintaining 2-inch spacing.
- Create a gentle indentation in the center of each cookie using your thumb or the back of a spoon.
- Bake for 8-10 minutes, ensuring cookie edges are set and slightly firm.
- Allow cookies to rest on the baking sheet for 5 minutes, then transfer to a wire rack for complete cooling.
- Whip cream cheese, powdered sugar, heavy cream, and pistachio paste until smooth and creamy.
- Fill each cooled cookie’s center with pistachio cream using a spoon or piping bag.
- Garnish with additional chopped pistachios for texture and visual appeal.
- Let cookies rest briefly to allow filling to stabilize before serving.
Notes
- Chill the dough for 30 minutes before rolling to prevent sticky hands and ensure a cleaner shape.
- Toast pistachios lightly before chopping to enhance their nutty flavor and create a more intense taste profile.
- Swap cream cheese with dairy-free alternatives like cashew cream for a vegan-friendly version of these decadent cookies.
- Use a small measuring spoon or melon baller to create perfectly uniform indentations in the cookie centers for consistent appearance.
- Prep Time: 25 minutes
- Cook Time: 10 minutes
- Category: Desserts, Snacks
- Method: Baking
- Cuisine: American
Nutrition
- Serving Size: 24
- Calories: 95 kcal
- Sugar: 4 g
- Sodium: 50 mg
- Fat: 6 g
- Saturated Fat: 3.5 g
- Unsaturated Fat: 2.5 g
- Trans Fat: 0 g
- Carbohydrates: 10 g
- Fiber: 1 g
- Protein: 2 g
- Cholesterol: 25 mg
Jess Martinez
Contributing Recipe Writer & Nutrition Consultant
Expertise
Southwestern and Latin American cooking, Nutritional analysis and healthy recipe planning, Cultural food traditions, Modifying traditional dishes for better health
Education
Santa Fe Community College
Certificate in Culinary Arts
Focused on mastering the flavors and cooking methods of traditional Southwestern cuisine.
Jess’s love for bold, homegrown flavors led her straight into the world of Southwestern cooking and cultural nutrition.
After completing her Certificate in Culinary Arts at Santa Fe Community College, she made it her mission to show that good-for-you food can still taste incredible.
At saltytart.com, Jess shares vibrant, health-conscious recipes with roots in tradition but a fresh, modern twist. When she’s not testing new recipes, you’ll find her at local growers’ markets, tending her herb garden, or digging into food history books.