The Ultimate Classic Chocolate Snowball Cookies Recipe
Nestled in the world of delightful classic chocolate snowball cookies lies a treat that whispers comfort and nostalgia.
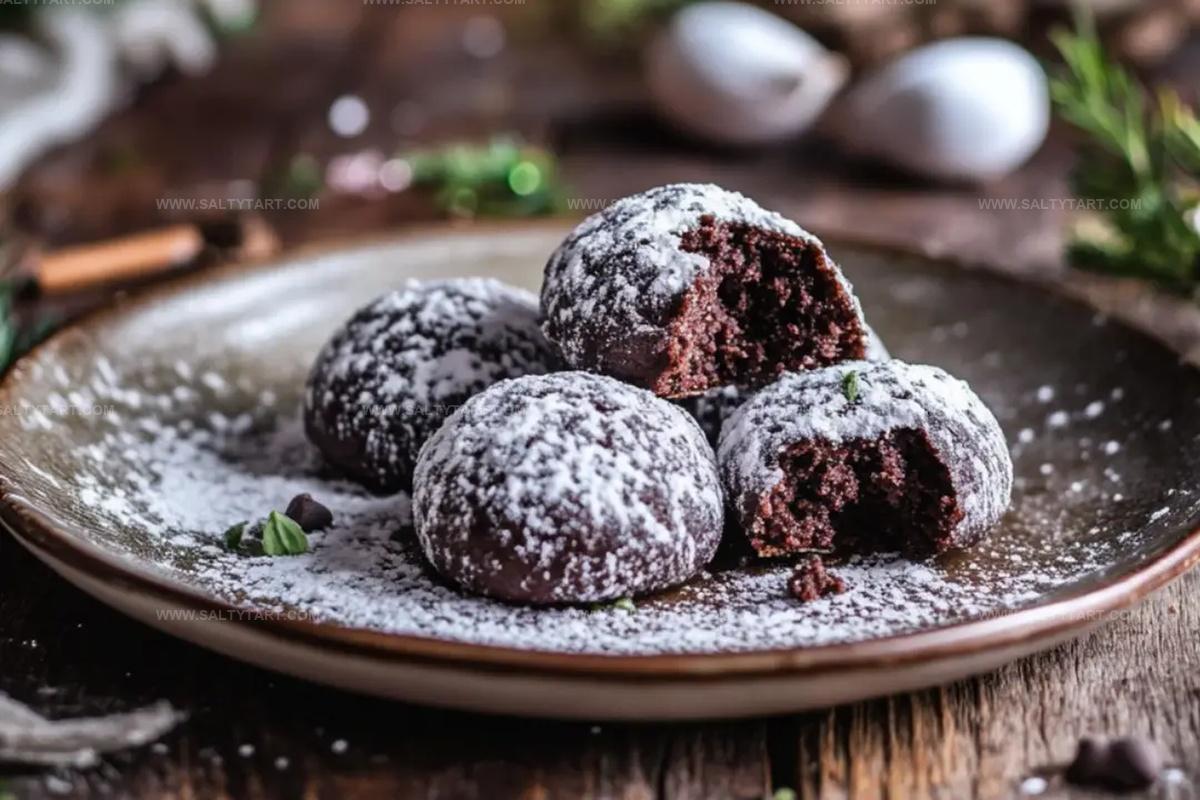
Soft, crumbly textures melt against your tongue with each delicate bite.
Powdered sugar creates a magical winter landscape across these delectable morsels.
Rich chocolate hints peek through the snowy coating, promising deep flavor sensations.
Baking these treats connects you to cherished memories of kitchen gatherings and sweet moments.
Simple ingredients dance together, creating something extraordinary with minimal effort.
You’ll fall in love with how effortlessly these cookies come together, transforming ordinary ingredients into something spectacular.
One taste, and these snowball cookies will become your new favorite winter indulgence.
Classic Chocolate Snowball Cookies Highlights
Ingredients in Classic Chocolate Snowball Cookies
Main Ingredients:Flavor Enhancers:Optional Add-Ins:How to Bake Classic Chocolate Snowball Cookies
Step 1: Prepare Baking Station
Preheat the oven to 350°F. Cover a baking sheet with parchment paper to prevent sticking and ensure easy cookie removal.
Step 2: Create Creamy Base
Blend together softened butter and powdered sugar using an electric mixer. Whip until the mixture becomes light and fluffy, which takes about 3-4 minutes.
Mix in vanilla extract thoroughly.
Step 3: Combine Dry Ingredients
In a separate bowl, mix:Slowly incorporate dry ingredients into the butter mixture.
Gently fold until just combined. If desired, add chopped nuts at this stage.
Step 4: Form Cookie Balls
Use hands or a cookie scoop to shape dough into small round balls, approximately 1 inch in diameter. Arrange cookies on the prepared baking sheet, spacing them 2 inches apart to allow room for spreading.
Step 5: Bake to Perfection
Place cookies in the preheated oven. Bake for 10-12 minutes until cookies appear set but not browned.
Let cookies rest on the baking sheet for a few minutes after removing from oven.
Step 6: Create Snowy Coating
Once cookies have completely cooled, generously roll each one in powdered sugar.
Ensure full coverage to achieve the classic snowball appearance.
Pro Tips for Classic Chocolate Snowball Cookies
Variations to Try with Classic Chocolate Snowball Cookies
Pairing Suggestions for Classic Chocolate Snowball Cookies
Blend a rich, creamy chocolate drink with hints of vanilla and a dash of cinnamon to complement the cookie’s deep cocoa flavor.
Create a non-alcoholic espresso martini using cold brew coffee, chocolate syrup, and a splash of cream to enhance the cookie’s sweet and bitter notes.
Serve a tart, refreshing raspberry sorbet alongside the cookies to balance their rich, buttery texture and provide a fruity contrast.
Craft a smooth hazelnut latte with steamed milk and a drizzle of caramel syrup to echo the nutty undertones and chocolatey warmth of the snowball cookies.
Storage Advice on Classic Chocolate Snowball Cookies
FAQs
These cookies are beginner-friendly and require basic baking skills. The recipe involves simple mixing, rolling, and coating techniques that even novice bakers can easily master.
Don’t overmix the dough and use softened butter at room temperature. Gently combine ingredients and avoid pressing the dough too firmly when shaping to maintain a delicate, crumbly texture.
Yes, you can prepare the dough in advance and refrigerate it for up to 3 days before baking. You can also freeze the unbaked dough balls for up to 2 months, adding a few extra minutes to the baking time when ready to cook.
Print
Classic Chocolate Snowball Cookies Recipe
- Total Time: 32 minutes
- Yield: 24 1x
Description
Delightful chocolate snowball cookies melt hearts with their powdery charm, bringing European baking traditions to your kitchen. Buttery, rich morsels dusted with confectioners’ sugar promise a sweet escape you’ll savor with each delectable bite.
Ingredients
Main Ingredients:
- 2 cups all-purpose flour
- 1 cup unsalted butter, softened
- 1/4 cup unsweetened cocoa powder
Flavoring and Sweeteners:
- 1/2 cup powdered sugar, plus extra for rolling
- 1 teaspoon vanilla extract
- 1/4 teaspoon salt
Optional Add-ins:
- 1 cup finely chopped nuts
Instructions
- Prepare the oven environment by heating to 350°F and lining a baking sheet with parchment paper for optimal cookie performance.
- Create a creamy base by whipping softened butter and powdered sugar until the mixture becomes light, airy, and smooth. Incorporate vanilla extract to enhance the flavor profile.
- Craft the dry ingredient blend by whisking flour, cocoa powder, and salt together in a separate mixing vessel. Gradually integrate this mixture into the butter combination, ensuring minimal mixing to maintain cookie tenderness. Gently fold in chopped nuts if desired.
- Transform the dough into perfectly uniform spheres using gentle hand-rolling techniques or a precise cookie scoop. Arrange these delicate orbs across the prepared baking surface, allowing sufficient spacing for potential expansion.
- Initiate the baking process for 10-12 minutes, monitoring carefully to achieve a set texture without excessive browning. Allow cookies to rest briefly on the baking sheet before transferring to a cooling rack for complete temperature reduction.
- Finish the cookies by generously enrobing each cooled sphere in a luxurious coating of powdered sugar, creating a delightful snow-like exterior that transforms the treats into elegant confections.
Notes
- Adjust cocoa intensity by selecting different cocoa powder types like Dutch-processed or natural cocoa for varied flavor profiles.
- Enhance texture by chilling dough for 30 minutes before shaping, which prevents spreading and creates more compact cookies.
- Consider gluten-free alternatives by substituting all-purpose flour with almond or coconut flour for those with dietary restrictions.
- Toast chopped nuts like pecans or walnuts briefly before adding to dough to elevate their nutty flavor and create a deeper, more complex taste.
- Prep Time: 20 minutes
- Cook Time: 12 minutes
- Category: Snacks, Desserts
- Method: Baking
- Cuisine: American
Nutrition
- Serving Size: 24
- Calories: 120 kcal
- Sugar: 4 g
- Sodium: 40 mg
- Fat: 8 g
- Saturated Fat: 5 g
- Unsaturated Fat: 3 g
- Trans Fat: 0 g
- Carbohydrates: 12 g
- Fiber: 1 g
- Protein: 2 g
- Cholesterol: 20 mg
Mike Reynolds
Founder & Recipe Developer
Expertise
Farm-to-table cuisine, Seasonal recipe development, Sustainable cooking techniques, Food photography
Education
Asheville-Buncombe Technical Community College (A-B Tech)
Associate Degree in Culinary Arts
Mike studied culinary arts with a strong focus on farm-to-table principles and sustainable cooking. His training emphasized the importance of fresh, local ingredients and environmentally responsible practices in the kitchen.
Mike’s food journey began deep in the Blue Ridge Mountains, where weekends at farmers’ markets and home-cooked meals sparked a lifelong obsession with simple, seasonal eating.
After earning his Associate Degree in Culinary Arts from Asheville-Buncombe Technical Community College, he set out to bring farm-to-table cooking into everyday kitchens, without the fuss.
Mike’s philosophy is all about keeping it fresh, unfussy, and full of heart. When he’s not crafting new single-serving recipes, he’s hiking mountain trails, chatting with local farmers, or experimenting with wild ingredients in his backyard kitchen.