
Dreamy Coconut No-Bake Balls Recipe: Bite-Sized Joy in Minutes
Sweet coconut no-bake balls dance between decadent treat and healthy snack, offering a guilt-free indulgence that satisfies every craving.
Whipping up these delightful morsels requires minimal effort and just a handful of pantry staples.
Crunchy nuts and smooth coconut create a magical texture that melts in your mouth.
Rich with natural sweetness, these bite-sized delights pack a punch of flavor without complex cooking techniques.
Minimal ingredients mean maximum enjoyment, perfect for spontaneous dessert moments.
Each round promises a burst of tropical essence that transports you to sunny beaches.
Ready to transform simple ingredients into something extraordinary?
Let’s roll into this delicious adventure!
Why Pineapple Coconut No-Bake Balls Are a Treat
Ingredients for Pineapple Coconut No-Bake Balls
Main Ingredients:Liquid Sweeteners and Flavor Enhancers:Finishing and Seasoning:Easy Steps for Making No-Bake Pineapple Coconut Balls
Step 1: Blend Tropical Ingredients
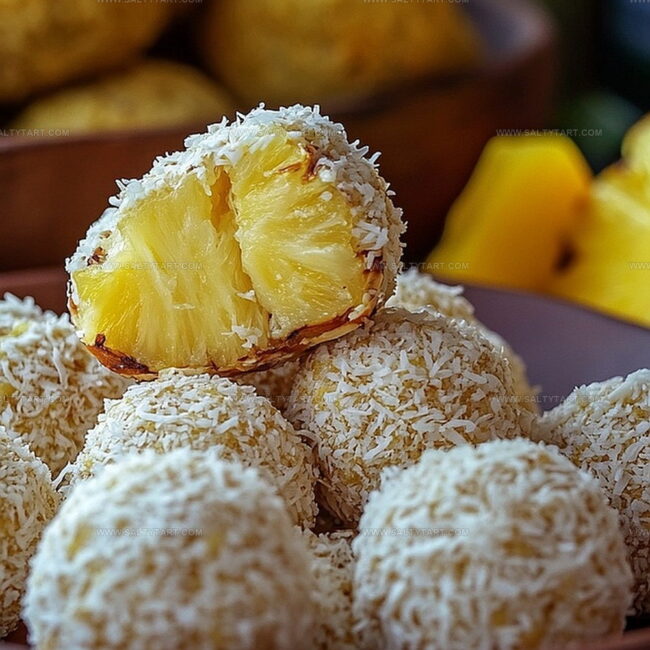
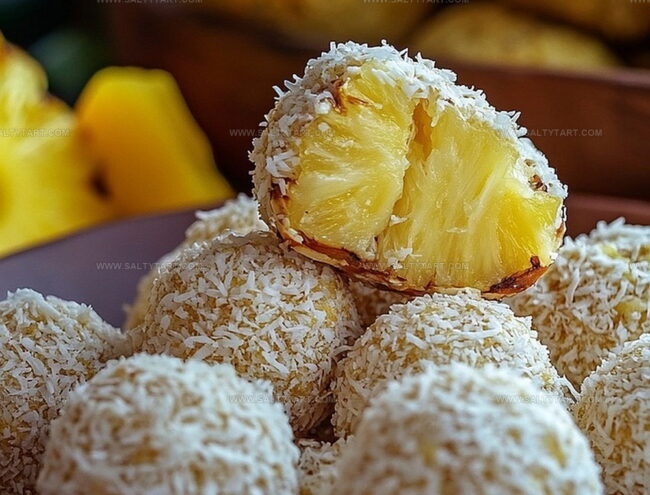
In a food processor, toss in dried pineapple, shredded coconut, almond flour, honey, vanilla extract, sea salt, and melted coconut oil. Pulse everything together until the mixture becomes sticky and completely blended, creating a smooth tropical base.
Step 2: Shape Delightful Spheres
Use your hands to scoop out small portions of the mixture. Gently roll each portion between your palms, creating uniform bite-sized balls that hold together nicely.
Make sure each ball is compact and round.
Step 3: Create Coconut Coating
Spread additional shredded coconut on a clean surface.
Carefully roll each ball through the coconut, ensuring a complete and even exterior coating. Gently press the coconut into the surface so it adheres perfectly.
Step 4: Chill and Solidify
Transfer the coconut-coated balls onto a parchment-lined tray. Place the tray in the refrigerator and let the balls chill for at least 30 minutes.
This cooling time helps them firm up and enhances their texture.
Step 5: Store and Savor
Once chilled, these tropical treats are ready to enjoy.
Keep any remaining balls in an airtight container in the refrigerator. They will stay fresh and delicious for up to one week, providing a quick and tasty snack whenever you desire.
Tips for Chewy and Tasty No-Bake Balls
Creative Add-Ins for Pineapple Coconut Balls
Pairings With Pineapple Coconut No-Bake Balls
Blend a mango-pineapple smoothie with coconut milk to complement the no-bake balls’ tropical flavor profile.
Serve a small shot of coconut rum or a light, crisp white rum to enhance the tropical essence of the dessert.
Brew a light, smooth Kona coffee to balance the sweetness and add depth to the pineapple coconut balls’ taste experience.
Steep a chamomile or lemongrass tea to provide a gentle, refreshing counterpoint to the rich, sweet treat.
Storing Pineapple Coconut Balls for Snacking
FAQs
Yes, they’re packed with natural ingredients like pineapple, coconut, and almond flour. They provide good nutrients and are a healthier alternative to traditional sugary snacks.
Absolutely! You can substitute honey with maple syrup, agave nectar, or date syrup. Each will slightly change the flavor but maintain the recipe’s overall sweetness.
Add a little more melted coconut oil or honey to help bind the ingredients. Mix slowly until you achieve a sticky, rollable consistency that holds together easily.
Print
Dreamy Coconut No-Bake Balls Recipe
- Total Time: 45 minutes
- Yield: 12 1x
Description
Coconut no-bake balls bring tropical paradise right to your kitchen with their creamy, luscious texture. Sweet medley of shredded coconut, condensed milk, and vanilla creates irresistible bite-sized treats you’ll crave again and again.
Ingredients
Main Ingredients:
- 1 cup dried pineapple, finely chopped
- 1 1/2 cups (360 milliliters) unsweetened shredded coconut
- 1/2 cup (60 grams) almond flour
Binding Ingredients:
- 1/4 cup (60 milliliters) honey
- 1 tablespoon (15 milliliters) coconut oil, melted
Flavor Enhancers:
- 1/2 teaspoon vanilla extract
- 1/4 teaspoon sea salt
Coating:
- Additional unsweetened shredded coconut for rolling
Instructions
- Blend dried pineapple, shredded coconut, almond flour, honey, vanilla extract, sea salt, and melted coconut oil in a food processor until the mixture becomes cohesive and slightly sticky.
- Using clean hands, gently scoop out small portions of the mixture and roll into uniform, compact bite-sized spheres.
- Create a separate shallow dish with additional shredded coconut for coating the balls evenly, rotating each sphere to ensure complete coverage.
- Arrange the coconut-coated balls on a parchment-lined tray, maintaining slight separation between each piece.
- Refrigerate the prepared balls for a minimum of 30 minutes to help them firm up and enhance their texture.
- Once chilled, transfer the no-bake balls to an airtight container, ensuring they remain fresh and maintain their structural integrity.
- Consume within one week when stored in the refrigerator, enjoying the tropical fusion of pineapple and coconut flavors.
Notes
- Swap honey with maple syrup or agave nectar for a vegan-friendly version that maintains the sweet, tropical flavor profile.
- Toast the shredded coconut before coating the balls to enhance the nutty, caramelized taste and add a delightful crunch.
- Use a small cookie scoop or melon baller for perfectly uniform, bite-sized treats that look professionally prepared and consistent.
- For those with nut allergies, replace almond flour with sunflower seed flour or coconut flour to keep the recipe safe and equally delicious.
- Prep Time: 15 minutes
- Cook Time: 30 minutes
- Category: Snacks, Desserts
- Method: Blending
- Cuisine: Fusion
Nutrition
- Serving Size: 12
- Calories: 155 kcal
- Sugar: 11 g
- Sodium: 50 mg
- Fat: 9 g
- Saturated Fat: 7 g
- Unsaturated Fat: 2 g
- Trans Fat: 0 g
- Carbohydrates: 17 g
- Fiber: 3 g
- Protein: 2 g
- Cholesterol: 0 mg
Jess Martinez
Contributing Recipe Writer & Nutrition Consultant
Expertise
Southwestern and Latin American cooking, Nutritional analysis and healthy recipe planning, Cultural food traditions, Modifying traditional dishes for better health
Education
Santa Fe Community College
Certificate in Culinary Arts
Focused on mastering the flavors and cooking methods of traditional Southwestern cuisine.
Jess’s love for bold, homegrown flavors led her straight into the world of Southwestern cooking and cultural nutrition.
After completing her Certificate in Culinary Arts at Santa Fe Community College, she made it her mission to show that good-for-you food can still taste incredible.
At saltytart.com, Jess shares vibrant, health-conscious recipes with roots in tradition but a fresh, modern twist. When she’s not testing new recipes, you’ll find her at local growers’ markets, tending her herb garden, or digging into food history books.