Heavenly Lemon Angel Pie Recipe: A Zesty Cloud of Sweetness
Sweet and cloud-like, this classic lemon angel pie recipe promises a dessert that dances between tangy brightness and delicate sweetness.
Crisp meringue creates a stunning base that melts in your mouth with each delightful bite.
The zesty lemon filling bursts with bright citrus notes, cutting through the airy meringue with perfect balance.
Whipped egg whites transform into a dreamy crust that cradles the silky lemon curd.
Minimal ingredients combine to create a showstopping dessert that looks far more complicated than it actually is.
Elegant yet simple, this pie will become your new go-to dessert for special occasions or spontaneous sweet cravings.
Prepare to wow everyone at the table with this absolutely irresistible treat.
Why Lemon Angel Pie Is So Light
Ingredients for a Fluffy Lemon Angel Pie
Meringue Base:Lemon Filling:Garnish:Steps to Make a Classic Lemon Angel Pie

Step 1: Prepare Oven and Pan
Warm up your oven to 275°F. Lightly grease a 9-inch pie pan, creating a smooth surface for your delicate meringue base.
Step 2: Whip Ethereal Meringue Base
In a spotless mixing bowl, transform egg whites with cream of tartar into a cloud-like mixture. Beat on medium speed until soft, billowy peaks emerge.
Slowly introduce sugar, one tablespoon at a time, switching to high speed. Continue whipping until the meringue becomes stiff and gloriously glossy.
Step 3: Fold in Delicate Flavors
Gently incorporate:Fold these ingredients with a light touch to maintain the meringue’s airy texture.
Step 4: Shape Meringue Crust
Spoon the fluffy meringue into the prepared pan.
Sculpt it into a delicate crust, creating slightly raised edges for a beautiful presentation.
Step 5: Bake and Cool Meringue
Bake for 50-60 minutes until the crust turns lightly golden and feels firm.
Turn off the oven, leaving the door slightly open, allowing the meringue to cool gradually and maintain its delicate structure.
Step 6: Craft Zesty Lemon Filling
In a saucepan, whisk together:Cook over medium-low heat, stirring constantly.
The mixture should thicken enough to coat a spoon without boiling.
Step 7: Strain and Cool Filling
Push the lemon mixture through a fine-mesh sieve to remove any cooked egg bits.
Let the filling cool to room temperature.
Step 8: Fold in Whipped Cream
In a separate bowl, whip heavy cream until stiff peaks form.
Gently fold the cream into the cooled lemon mixture, creating a smooth, luxurious filling.
Step 9: Assemble Pie
Pour the lemon filling into the cooled meringue crust.
Spread evenly to create a perfect layer.
Step 10: Chill and Set
Refrigerate the pie for 3-4 hours, allowing the filling to set completely.
Step 11: Garnish and Serve
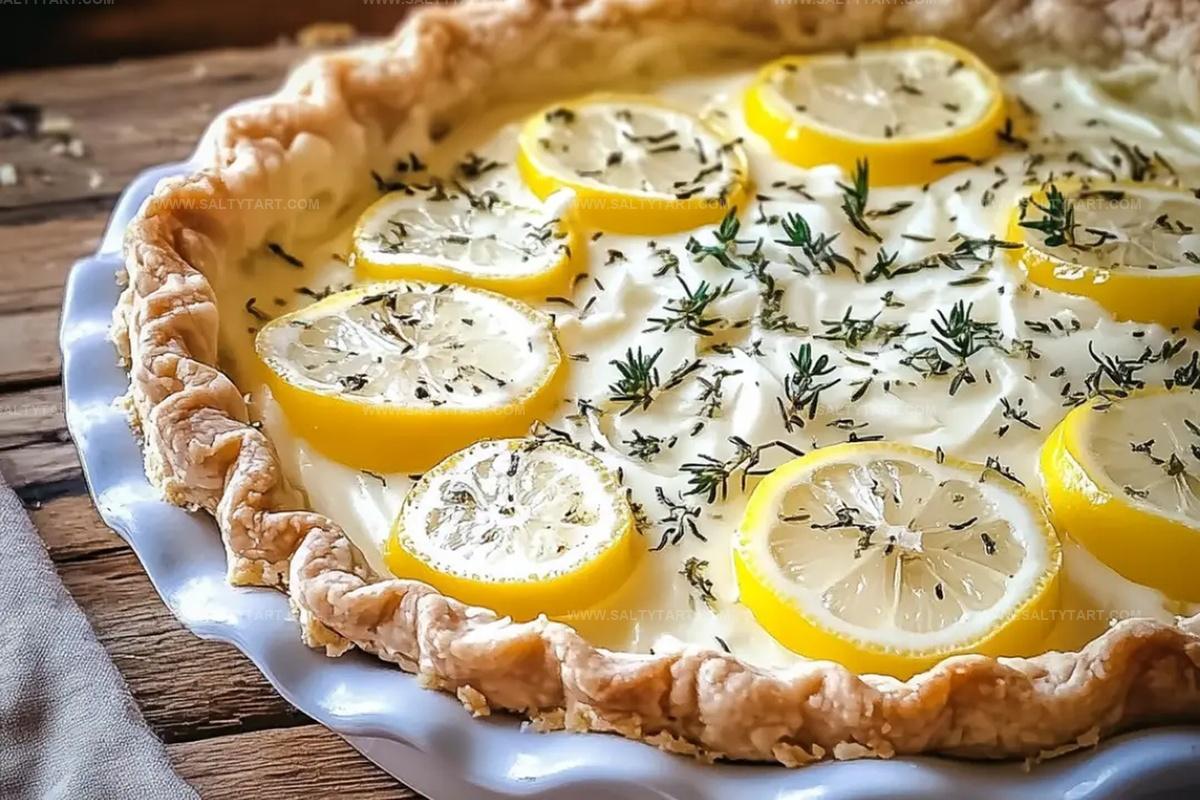
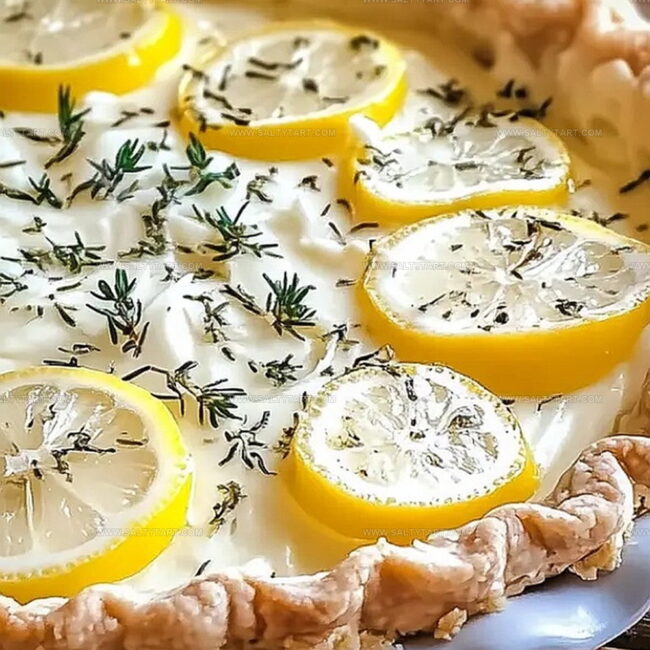
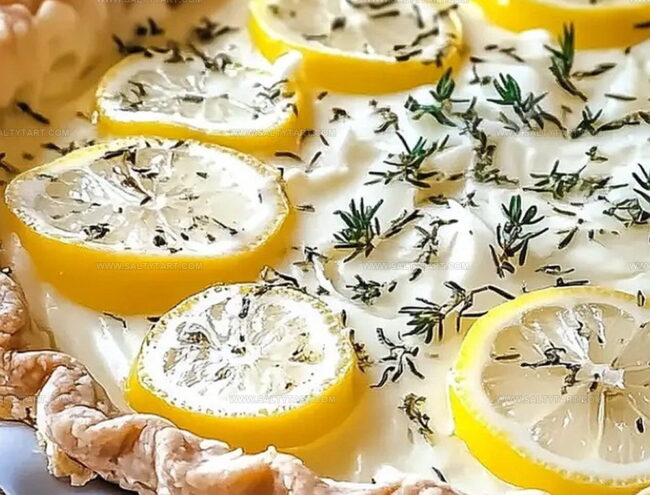
Optional final touch: Top with whipped cream and sprinkle lemon zest curls. Slice and serve chilled, revealing the pie’s stunning layers.
Notes for Fluffy Lemon Angel Pie Fans
Variations for Angel Pie Lovers to Try
What Goes Well With Lemon Angel Pie
Storing Angel Pie for a Fluffy Slice
FAQs
The meringue crust is made by beating egg whites with sugar until stiff, glossy peaks form, creating a delicate, light base that’s baked at a low temperature to achieve a crisp texture.
Yes, this pie actually benefits from being prepared in advance. You can make it 3-4 hours before serving, allowing it to set properly in the refrigerator and develop its full flavor profile.
Absolutely! The pie uses no flour or wheat-based ingredients, making it naturally gluten-free and perfect for those with gluten sensitivities.
Print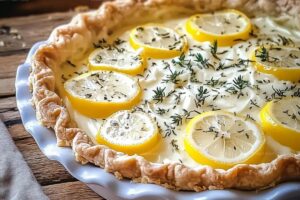
Lemon Angel Pie Recipe
- Total Time: 1 hour 30 minutes
- Yield: 8 1x
Description
Heavenly lemon angel pie whisks classic dessert dreams into a cloud-like meringue haven of zesty citrus delight. Silky lemon curd nestled between crisp meringue layers promises a refreshing escape you’ll savor with pure dessert bliss.
Ingredients
Main Ingredients:
- 4 large egg whites
- 1 cup granulated sugar
Stabilizing Ingredients:
- 1/8 teaspoon cream of tartar
- 1 tablespoon cornstarch
Flavoring Ingredients:
- 1 teaspoon vanilla extract
Instructions
- Warm the oven to 275F and prepare a 9-inch pie pan with light greasing.
- Whip egg whites with cream of tartar until soft peaks develop, using medium speed mixer.
- Incorporate sugar gradually while beating at high speed, creating stiff and glossy meringue peaks.
- Delicately fold vanilla extract and cornstarch into meringue mixture.
- Transfer meringue into prepared pan, crafting a delicate crust with elevated edges.
- Bake 50-60 minutes until meringue becomes firm and achieves a pale golden hue, then switch off oven and leave crust inside with door slightly open for cooling.
- Combine egg yolks, sugar, lemon juice, and zest in saucepan, whisking thoroughly.
- Simmer mixture over medium-low heat, stirring continuously until thickened and able to coat spoon’s back, approximately 5-7 minutes.
- Strain lemon mixture through fine sieve to eliminate potential cooked egg fragments, then allow to reach room temperature.
- Whip heavy cream until achieving sturdy peaks.
- Gently incorporate whipped cream into cooled lemon mixture until smooth and uniform.
- Pour lemon filling evenly across cooled meringue crust.
- Refrigerate pie 3-4 hours until completely set.
- Optional garnish with additional whipped cream and decorative lemon zest curls.
- Serve chilled and enjoy.
Notes
- Ensure your mixing bowl and beaters are completely grease-free to achieve perfect, fluffy egg white peaks.
- Use room temperature eggs for easier separation and better volume when whipping egg whites.
- Incorporate cornstarch and vanilla with a light touch to maintain the meringue’s delicate structure.
- The low oven temperature creates a crisp, marshmallow-like meringue crust without browning.
- This naturally gluten-free dessert works perfectly for those with wheat sensitivities.
- The pie can be prepared a day in advance, making it ideal for entertaining.
- Experiment with different citrus juices like lime or orange for unique flavor variations.
- Prep Time: 30 minutes
- Cook Time: 1 hour
- Category: Desserts
- Method: Baking
- Cuisine: American
Nutrition
- Serving Size: 8
- Calories: 110 kcal
- Sugar: 26 g
- Sodium: 10 mg
- Fat: 0 g
- Saturated Fat: 0 g
- Unsaturated Fat: 0 g
- Trans Fat: 0 g
- Carbohydrates: 27 g
- Fiber: 0 g
- Protein: 2.5 g
- Cholesterol: 0 mg
Jess Martinez
Contributing Recipe Writer & Nutrition Consultant
Expertise
Southwestern and Latin American cooking, Nutritional analysis and healthy recipe planning, Cultural food traditions, Modifying traditional dishes for better health
Education
Santa Fe Community College
Certificate in Culinary Arts
Focused on mastering the flavors and cooking methods of traditional Southwestern cuisine.
Jess’s love for bold, homegrown flavors led her straight into the world of Southwestern cooking and cultural nutrition.
After completing her Certificate in Culinary Arts at Santa Fe Community College, she made it her mission to show that good-for-you food can still taste incredible.
At saltytart.com, Jess shares vibrant, health-conscious recipes with roots in tradition but a fresh, modern twist. When she’s not testing new recipes, you’ll find her at local growers’ markets, tending her herb garden, or digging into food history books.