
Dreamy No-Bake Banana Split Cake Recipe for Sweet Tooths
Whipping up a delectable no-bake banana split cake promises pure dessert magic for sweet-tooth enthusiasts.
Creamy layers and fruity flavors dance together in this simple yet impressive treat.
Summer gatherings call for something special that requires zero oven time.
Cool and refreshing, this dessert brings nostalgic ice cream parlor vibes right to your table.
Rich cream cheese blends seamlessly with ripe bananas and sweet pineapple chunks.
Crushed graham crackers provide a delightful crunch beneath silky smooth layers.
Come explore this effortless recipe that guarantees smiles around every delicious bite.
Ingredients for No-Bake Banana Split Cake
Crust Ingredients:Filling Ingredients:Fruit and Topping Ingredients:How to Assemble No-Bake Banana Split Cake
Step 1: Create the Crunchy Base
Grab graham cracker crumbs and mix them with melted butter and a pinch of salt in a bowl. Press this mixture firmly into the bottom of a greased 9×13-inch baking dish, creating a solid foundation for your delightful dessert.
Pop the dish into the refrigerator while you prepare the next layer.
Step 2: Whip Up the Creamy Filling
In a large mixing bowl, blend softened cream cheese with sugar and vanilla extract until the mixture becomes silky smooth.
Gently fold in whipped topping, creating a cloud-like filling that will make your taste buds dance. Spread this dreamy layer evenly over the chilled crust.
Step 3: Layer the Fruity Goodness
Arrange fresh banana slices in a beautiful layer across the cream cheese filling. Next, scatter well-drained crushed pineapple over the bananas.
Top these tropical fruits with vibrant sliced strawberries, creating a colorful and mouthwatering landscape.
Step 4: Crown with Delicious Toppings
Generously spread another layer of whipped topping over the fruit.
Drizzle rich chocolate sauce in an artistic pattern. Sprinkle chopped hazelnuts for a delightful crunch.
Cover the entire masterpiece with plastic wrap.
Step 5: Chill and Serve
Refrigerate the cake for at least 4 hours or overnight.
This resting time allows all the flavors to mingle and create a harmonious dessert experience. When ready, slice and serve this cool, refreshing treat that captures the essence of a classic banana split in cake form.
Pro Tips for No-Bake Banana Split Cake Success
Flavorful Variations for Banana Split Cake
Perfect Pairings with Banana Split Cake
Storage Tips for No-Bake Banana Split Cake
FAQs
This no-bake banana split cake is super easy and requires no baking skills. You just need to mix, layer, and chill the ingredients. Perfect for beginner bakers or anyone who wants a quick dessert.
Absolutely! You can swap graham crackers with digestive biscuits for the crust. Replace hazelnuts with almonds or pecans. Use whatever whipped cream or fresh fruits you have available.
The banana split cake will stay delicious for 3-4 days when stored properly in an airtight container in the refrigerator. Just make sure to keep it chilled to maintain its texture and flavor.
Yes, this dessert is perfect for kids!
No-Bake Banana Split Cake Highlights
Print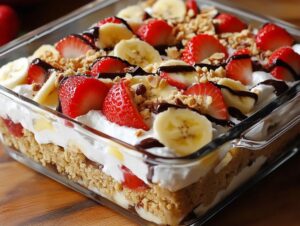
No-Bake Banana Split Cake Recipe
- Total Time: 4 hours 30 minutes
- Yield: 12 1x
Description
Creamy layers of classic banana split delights shine in this heavenly no-bake dessert. Cool graham cracker crust meets luscious cream cheese filling, fresh bananas, and dreamy chocolate drizzle, promising pure summer sweetness for you.
Ingredients
Main Ingredients (Fruits):
- 3 to 4 bananas, sliced
- 20 ounces (567 grams) strawberries, sliced
- 20 ounces (567 grams) crushed pineapple, well-drained
Filling Ingredients:
- 16 ounces (454 grams) cream cheese, softened
- 8 ounces (227 grams) whipped topping
- 1/2 cup granulated sugar
- 1 teaspoon vanilla extract
Crust and Topping Ingredients:
- 2 cups graham cracker crumbs
- 1/3 cup unsalted butter, melted
- 1 teaspoon salt
- 8 ounces (227 grams) whipped topping
- 1/2 cup chopped hazelnuts
- Chocolate sauce
Instructions
- Craft a sturdy foundation by combining graham cracker crumbs with melted butter and a hint of salt, ensuring thorough mixing.
- Press the crumb mixture compactly into a greased 9×13-inch dish, creating an even, firm base.
- Temporarily chill the crust in the refrigerator while preparing subsequent layers.
- Whip cream cheese until silky smooth, incorporating sugar and vanilla extract for rich, creamy consistency.
- Gently fold whipped topping into the cream cheese mixture, maintaining a light, airy texture.
- Distribute the filling uniformly across the chilled crust, creating an even layer.
- Create a vibrant fruit layer by arranging fresh banana slices across the cream cheese surface.
- Distribute well-drained crushed pineapple evenly over the banana layer, ensuring complete coverage.
- Artfully place sliced strawberries atop the pineapple, adding color and texture.
- Crown the dessert with an additional layer of whipped topping, spreading gently to cover the fruit.
- Enhance the presentation by drizzling chocolate sauce and sprinkling chopped hazelnuts.
- Seal with plastic wrap and refrigerate for a minimum of 4 hours, allowing flavors to harmonize and the dessert to set completely.
- Serve thoroughly chilled, cutting into precise squares that showcase the beautiful layered composition.
Notes
- Customize the crust by swapping graham crackers with gluten-free alternatives like almond flour or crushed gluten-free cookies for those with dietary restrictions.
- Ensure bananas are perfectly ripe but not overripe to maintain ideal texture and prevent excessive browning when layering.
- Drain pineapple thoroughly using a fine-mesh strainer or cheesecloth to prevent excess liquid from making the dessert watery and compromising the cake’s structure.
- Prepare this dessert a day ahead for deeper flavor development and easier serving, allowing ingredients to meld and set completely in the refrigerator.
- Prep Time: 30 minutes
- Cook Time: 4 hours
- Category: Desserts
- Method: Refrigerating
- Cuisine: American
Nutrition
- Serving Size: 12
- Calories: 290 kcal
- Sugar: 21 g
- Sodium: 210 mg
- Fat: 18 g
- Saturated Fat: 7 g
- Unsaturated Fat: 9 g
- Trans Fat: 0.2 g
- Carbohydrates: 27 g
- Fiber: 2 g
- Protein: 4 g
- Cholesterol: 30 mg
Mike Reynolds
Founder & Recipe Developer
Expertise
Farm-to-table cuisine, Seasonal recipe development, Sustainable cooking techniques, Food photography
Education
Asheville-Buncombe Technical Community College (A-B Tech)
Associate Degree in Culinary Arts
Mike studied culinary arts with a strong focus on farm-to-table principles and sustainable cooking. His training emphasized the importance of fresh, local ingredients and environmentally responsible practices in the kitchen.
Mike’s food journey began deep in the Blue Ridge Mountains, where weekends at farmers’ markets and home-cooked meals sparked a lifelong obsession with simple, seasonal eating.
After earning his Associate Degree in Culinary Arts from Asheville-Buncombe Technical Community College, he set out to bring farm-to-table cooking into everyday kitchens, without the fuss.
Mike’s philosophy is all about keeping it fresh, unfussy, and full of heart. When he’s not crafting new single-serving recipes, he’s hiking mountain trails, chatting with local farmers, or experimenting with wild ingredients in his backyard kitchen.