
Tangy No-Bake Lemon Curd Dream Slice Recipe for Summer Bliss
Cool summer afternoons find their perfect match in this no-bake lemon curd dream slice that promises pure refreshment.
Zesty citrus notes dance across a creamy landscape, creating a dessert that whispers sweet comfort.
Layers of smooth, tangy goodness melt together without ever touching an oven.
Minimal ingredients and simple steps make this treat accessible for anyone seeking a delightful culinary escape.
Chilling transforms humble components into an elegant dessert that sparks conversation and delights taste buds.
Crisp textures and vibrant flavors promise a memorable experience you’ll want to savor slowly.
Prepare to fall in love with every delectable bite of this irresistible summer sensation.
Why No-Bake Lemon Curd Dream Slice Stands Out

Ingredients Needed for Lemon Curd Dream Slice
Base Ingredients:Filling Ingredients:Topping Ingredients:How to Make Lemon Curd Dream Slice Easily

Step 1: Crush and Combine Biscuit Base
Grab your favorite cookies and crush them into fine crumbs. Melt some butter and mix it thoroughly with the cookie crumbs until everything sticks together perfectly.
Press this mixture firmly into the bottom of a lined pan, creating a smooth, even layer. Pop the pan into the refrigerator and let it chill and set for about half an hour.
Step 2: Whip Up Creamy Filling
In a large mixing bowl, blend together:Whisk these ingredients until they transform into a silky, light, and fluffy mixture that looks absolutely dreamy.
Step 3: Layer the Creamy Goodness
Take your chilled biscuit base out of the refrigerator.
Spread the luscious cream cheese mixture evenly across the entire surface, making sure it’s smooth and covers every inch of the base.
Step 4: Drizzle Lemon Curd Magic
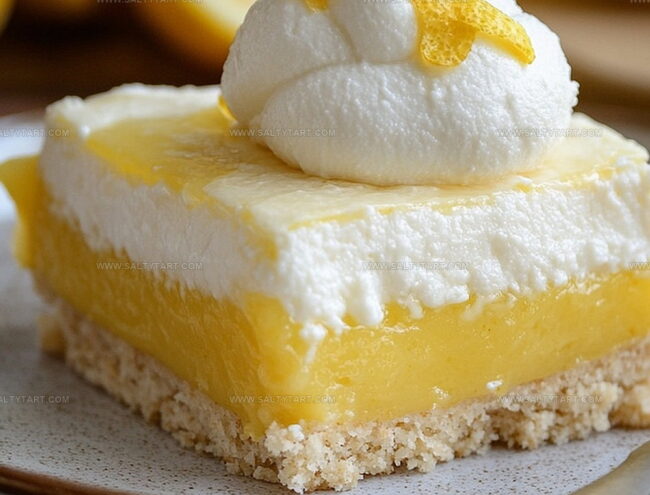
Gently spread the tangy lemon curd over the cream cheese layer.
Let it cascade beautifully across the surface, creating a sunshine-yellow topping that looks irresistible.
Step 5: Chill and Set
Return the pan to the refrigerator.
Let it rest and set for at least 4 hours or overnight. This waiting time allows all the flavors to mingle and the dessert to become perfectly firm.
Step 6: Slice and Serve
When ready, cut into neat squares. Serve chilled and watch everyone’s eyes light up with the first delicious bite of this no-bake lemony treat!
Tips for Lemon Curd Dream Slice Success
Variations to Try on Lemon Curd Dream Slice
What Goes Well with Lemon Curd Dream Slice
Select a zesty Sauvignon Blanc or Pinot Grigio that complements the lemon’s bright, tangy notes and cuts through the creamy richness.
Serve alongside a small plate of fresh raspberries or strawberries to add a vibrant, fruity contrast and balance the dessert’s creamy texture.
Brew a delicate lavender-infused tea that echoes the dessert’s delicate flavors and provides a soothing, aromatic companion to the lemon slice.
Top each slice with a small mint sprig to introduce a refreshing herbal element that lifts the dessert’s creamy and citrusy profile.
How to Store Lemon Curd Dream Slice
FAQs
Yes, graham crackers, digestive biscuits, or shortbread cookies work great as alternatives to the original recipe.
The No-Bake Lemon Curd Dream Slice can be stored in the refrigerator for up to 3-4 days when covered tightly with plastic wrap.
Absolutely! Simply substitute the regular biscuits with gluten-free cookies or graham crackers to create a gluten-free version of the dessert.
Yes, you can freeze the dessert for up to 2 weeks. Wrap it tightly in plastic wrap and place in an airtight container before freezing.
Print
No-Bake Lemon Curd Dream Slice Recipe
- Total Time: 4 hours 50 minutes
- Yield: 8 1x
Description
Luscious No-Bake Lemon Curd Dream Slice combines tangy citrus and creamy layers for a refreshing summer dessert. Chilled perfection awaits when you slice into this elegant, zesty treat that promises pure indulgence.
Ingredients
Main Ingredients:
- 200 grams (7 ounces) digestive biscuits
- 100 grams (3.5 ounces) unsalted butter
Lemon Curd Layer:
- 3 large eggs
- 150 grams (5.3 ounces) granulated sugar
- 2 tablespoons lemon zest
- 120 milliliters (4 fluid ounces) fresh lemon juice
- 4 tablespoons unsalted butter
Topping and Garnish:
- 240 milliliters (8 fluid ounces) heavy cream
- 2 tablespoons powdered sugar
- 1 teaspoon vanilla extract
Instructions
- Pulverize graham crackers and blend with melted butter until uniformly moist, creating a cohesive sandy texture.
- Transfer the crumb mixture into a lined rectangular pan, compressing thoroughly to create a compact, even foundation.
- Chill the base layer in the refrigerator for approximately 30 minutes to solidify and set.
- Whip cream cheese with whipping cream until achieving a silky, aerated consistency, incorporating powdered sugar, vanilla essence, fresh lemon juice, and zesty lemon shavings.
- Extract the chilled base from refrigerator and meticulously spread the cream cheese mixture across the surface, ensuring complete and uniform coverage.
- Delicately drizzle and distribute lemon curd atop the cream cheese layer, creating an elegant marbled appearance.
- Return the assembled dessert to the refrigerator, allowing it to rest and firm up for a minimum of 4 hours, preferably overnight.
- When ready to serve, extract from refrigerator and slice into precise, clean squares using a sharp knife wiped between cuts.
- Plate and present the chilled, tangy-sweet dessert, ready to delight taste buds with its creamy, zesty profile.
Notes
- Swap traditional biscuits with gluten-free alternatives for those with dietary restrictions, ensuring everyone can enjoy this delightful dessert.
- Use low-fat cream cheese and whipped cream to create a lighter version without compromising the rich, creamy texture.
- Enhance lemon flavor by adding extra zest or a splash of limoncello for a more intense citrusy kick.
- For a decorative touch, garnish with fresh mint leaves or candied lemon peel just before serving to elevate the visual appeal.
- Prep Time: 20 minutes
- Cook Time: 4 hours 30 minutes
- Category: Desserts
- Method: Refrigerating
- Cuisine: British
Nutrition
- Serving Size: 8
- Calories: 154
- Sugar: 3 g
- Sodium: 50 mg
- Fat: 9 g
- Saturated Fat: 5 g
- Unsaturated Fat: 4 g
- Trans Fat: 0 g
- Carbohydrates: 17 g
- Fiber: 1 g
- Protein: 2 g
- Cholesterol: 15 mg
Mike Reynolds
Founder & Recipe Developer
Expertise
Farm-to-table cuisine, Seasonal recipe development, Sustainable cooking techniques, Food photography
Education
Asheville-Buncombe Technical Community College (A-B Tech)
Associate Degree in Culinary Arts
Mike studied culinary arts with a strong focus on farm-to-table principles and sustainable cooking. His training emphasized the importance of fresh, local ingredients and environmentally responsible practices in the kitchen.
Mike’s food journey began deep in the Blue Ridge Mountains, where weekends at farmers’ markets and home-cooked meals sparked a lifelong obsession with simple, seasonal eating.
After earning his Associate Degree in Culinary Arts from Asheville-Buncombe Technical Community College, he set out to bring farm-to-table cooking into everyday kitchens, without the fuss.
Mike’s philosophy is all about keeping it fresh, unfussy, and full of heart. When he’s not crafting new single-serving recipes, he’s hiking mountain trails, chatting with local farmers, or experimenting with wild ingredients in his backyard kitchen.