
Pillow-Soft Crockpot Bread Recipe: Homemade Heaven in Every Slice
My latest culinary passion involves this pillow-soft crockpot bread that changed everything about my home baking adventures.
Slow cooking transforms simple ingredients into magic right inside your kitchen appliance.
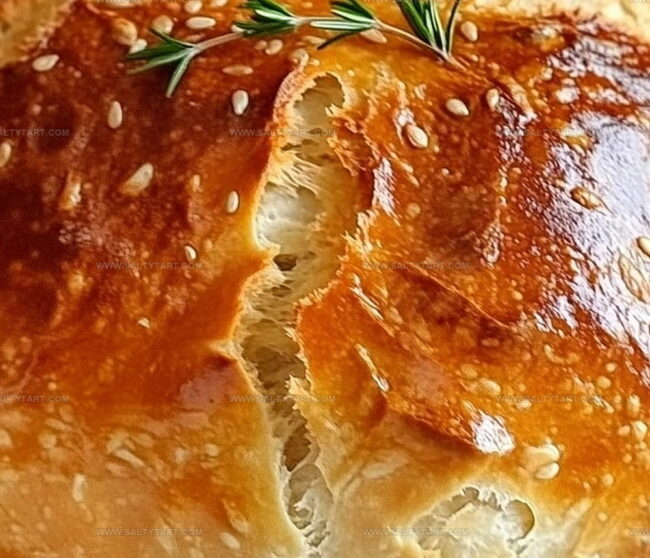
Crusty edges and tender centers make each slice feel like a warm hug.
Minimal effort produces maximum deliciousness with this foolproof method.
Kitchen newbies and seasoned bakers alike can master this technique without stress.
Professional bakery quality emerges from your countertop with surprising ease.
Let’s roll up our sleeves and create something delectable that will make everyone at the table cheer.
Crockpot Bread Easy Comfort With Slow Cooking

Ingredients Needed To Make Crockpot Bread
Dry Ingredients:Wet Ingredients:Optional Toppings:Preparation Ingredients:Detailed Steps For Crockpot Bread Preparation
Step 1: Whip Up the Dough
Mix flour, salt, and yeast in a large mixing bowl. Slowly pour in warm water and olive oil while stirring with a wooden spoon.
Continue mixing until a shaggy dough forms. Transfer to a floured surface and knead vigorously.
Work the dough with your hands, pushing and folding until it becomes smooth and springy. The dough should feel soft and elastic when you’re done.
Step 2: Let the Dough Rise and Relax
Place the dough in a greased bowl and cover completely with a clean towel or plastic wrap. Find a cozy, warm spot in your kitchen for the dough to rest.
Allow it to rise and double in size, which typically takes about 1-1.5 hours. The dough will look puffy and soft when it’s ready.
Step 3: Prepare the Crockpot Base
Line the bottom of your slow cooker with parchment paper. This prevents sticking and makes removing the bread easier.
Lightly grease the parchment paper with a thin layer of oil or dust with a sprinkle of flour.
Step 4: Shape and Decorate the Loaf
Gently punch down the risen dough to release air bubbles.
Shape it into a round, rustic loaf. Carefully place the dough into the prepared crockpot.
If you want extra flavor, sprinkle:Step 5: Cook the Bread
Cover the crockpot and set to high heat. Cook for 2-2.5 hours. The bread is perfectly done when it reaches an internal temperature of 190°F.
It should have a golden bottom and feel firm when touched.
Step 6: Create a Crispy Crust
For a crackling exterior, transfer the bread to a baking sheet.
Place under the broiler for 2-3 minutes. Watch carefully to prevent burning.
The crust will turn a beautiful golden brown.
Step 7: Cool and Slice
Remove the bread and let it cool on a wire rack for at least 20 minutes.
This helps set the interior and makes slicing easier. Serve warm with butter, jam, or your favorite spread.
Enjoy your homemade crockpot bread!
Helpful Tips To Perfect Crockpot Bread Every Time
Flavor Variations To Customize Crockpot Bread
Best Pairings To Enjoy With Crockpot Bread
Select a robust red wine like Chianti or Cabernet Sauvignon that complements the bread’s hearty texture, creating a delightful balance of flavors.
Match the crockpot bread with creamy soft cheeses like brie or camembert, or sharp aged cheddar to enhance the bread’s warm, comforting profile.
Prepare olive oil infused with herbs, garlic-roasted hummus, or rich tomato tapenade for an incredible dipping experience that highlights the bread’s crusty exterior.
Brew a fresh rosemary or thyme tea that echoes the potential herb toppings on the bread, offering a complementary aromatic drinking companion.
Storage Tips To Keep Crockpot Bread Fresh Longer
FAQs
Yes, you can experiment with whole wheat, bread flour, or a mix. Each flour type will slightly change the texture and flavor of your bread.
No, regular active dry yeast works perfectly. Just ensure it’s fresh and not expired for best rising results.
Check your yeast’s freshness, water temperature, and ensure the rising area is warm and draft-free. Ideal temperature is around 75-80°F for optimal yeast activation.
Absolutely! Crockpots create a moist environment that helps bread develop a soft interior while achieving a golden crust, especially when finished under the broiler.
Print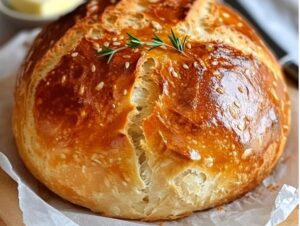
Pillow-Soft Crockpot Bread Recipe
- Total Time: 3 hours 20 minutes
- Yield: 8 1x
Description
Mediterranean-inspired crockpot bread weaves rustic charm into home kitchens with minimal effort. Warm, aromatic slices promise comfort and deliciousness you’ll savor with each delightful bite.
Ingredients
Main Ingredients:
- 3 cups all-purpose flour
- 1 1/2 cups warm water (110°F/43°C)
- 1 packet active dry yeast (2 1/4 teaspoons)
Seasoning and Flavor Enhancers:
- 1 teaspoon salt
- 2 tablespoons olive oil
Optional Toppings:
- Fresh or dried herbs (rosemary, thyme, oregano)
- Seeds (sesame, poppy, sunflower)
- Grated cheese
Instructions
- In a spacious mixing vessel, amalgamate dry ingredients including flour, salt, and yeast, creating a foundational mixture.
- Pour warm water and olive oil into the dry components, gently integrating with a wooden utensil until a cohesive, slightly shaggy dough emerges.
- Transfer the dough onto a lightly dusted surface and methodically knead for approximately 8 minutes, developing gluten and achieving a smooth, elastic consistency.
- Relocate the dough to a greased container, enveloping it with a breathable cloth or plastic membrane to create a nurturing environment for rising.
- Allow the dough to rest and expand in a draft-free, warm location for 1-1.5 hours, or until its volume doubles substantially.
- Prepare the crockpot by layering parchment paper across the base, then applying a delicate coating of grease to prevent adhesion.
- Deflate the risen dough with gentle pressure, then mold into a compact, rounded loaf matching the crockpot’s dimensions.
- Nestle the shaped dough into the prepared crockpot, optionally adorning with aromatic herbs, seeds, or grated cheese.
- Secure the crockpot lid and cook on high temperature for 2-2.5 hours, monitoring until the bread reaches an internal temperature of 190°F.
- For enhanced textural appeal, transfer the baked loaf to a baking sheet and broil for 2-3 minutes, watching carefully to achieve a golden, crisp exterior.
- Remove from heat and permit the bread to cool on a wire rack for 20 minutes, allowing internal steam to stabilize before slicing.
- Serve alongside butter, jam, or preferred accompaniments, savoring the freshly crafted artisan bread.
Notes
- Customize the dough by adding herbs like rosemary, thyme, or garlic powder for extra flavor complexity.
- Select active dry yeast or instant yeast, ensuring it’s fresh and not expired for optimal bread rising.
- Choose whole wheat flour or gluten-free flour blends to accommodate different dietary preferences and nutritional needs.
- Transfer bread carefully when crisping to prevent breaking or losing its delicate texture, using a flat spatula for smooth movement.
- Prep Time: 1 hour 15 minutes
- Cook Time: 2 hours 5 minutes
- Category: Breakfast, Lunch, Dinner, Snacks
- Method: Slow Cooking
- Cuisine: American
Nutrition
- Serving Size: 8
- Calories: 150 kcal
- Sugar: 0.2 g
- Sodium: 150 mg
- Fat: 3 g
- Saturated Fat: 0.4 g
- Unsaturated Fat: 2.6 g
- Trans Fat: 0 g
- Carbohydrates: 30 g
- Fiber: 1 g
- Protein: 4 g
- Cholesterol: 0 mg
Mike Reynolds
Founder & Recipe Developer
Expertise
Farm-to-table cuisine, Seasonal recipe development, Sustainable cooking techniques, Food photography
Education
Asheville-Buncombe Technical Community College (A-B Tech)
Associate Degree in Culinary Arts
Mike studied culinary arts with a strong focus on farm-to-table principles and sustainable cooking. His training emphasized the importance of fresh, local ingredients and environmentally responsible practices in the kitchen.
Mike’s food journey began deep in the Blue Ridge Mountains, where weekends at farmers’ markets and home-cooked meals sparked a lifelong obsession with simple, seasonal eating.
After earning his Associate Degree in Culinary Arts from Asheville-Buncombe Technical Community College, he set out to bring farm-to-table cooking into everyday kitchens, without the fuss.
Mike’s philosophy is all about keeping it fresh, unfussy, and full of heart. When he’s not crafting new single-serving recipes, he’s hiking mountain trails, chatting with local farmers, or experimenting with wild ingredients in his backyard kitchen.