Dreamy Red Velvet Cheesecake Mini Pies Recipe for Sweet Moments
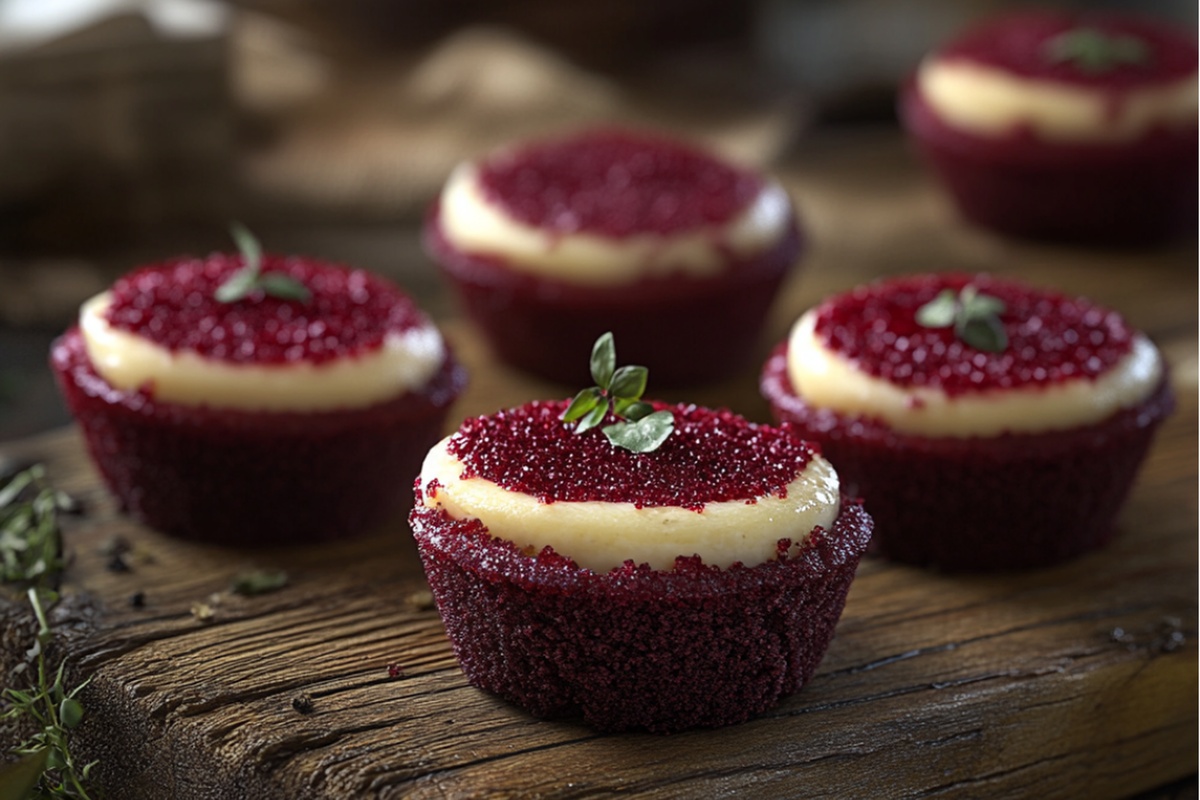
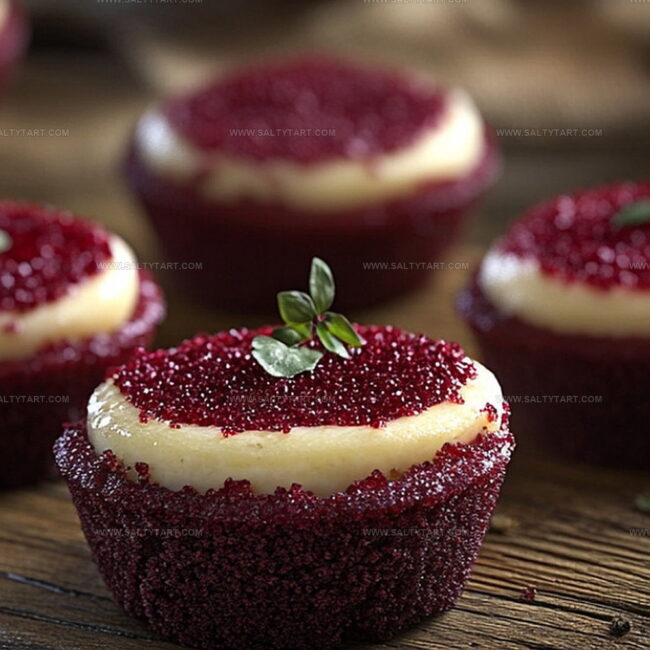
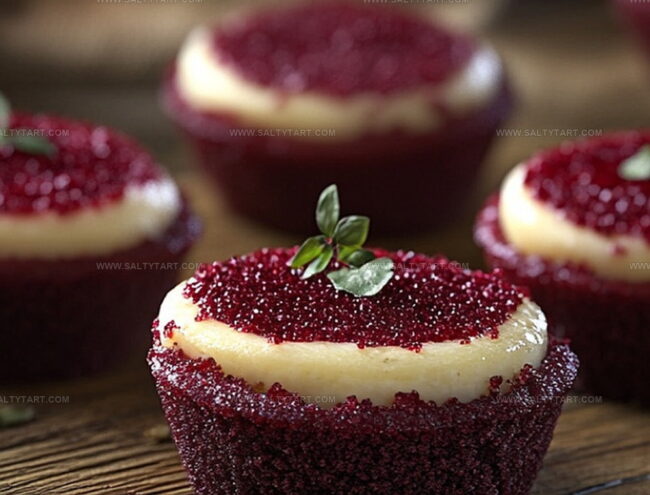
Sweet and decadent red velvet cheesecake mini pies dance on the palate with luxurious charm.
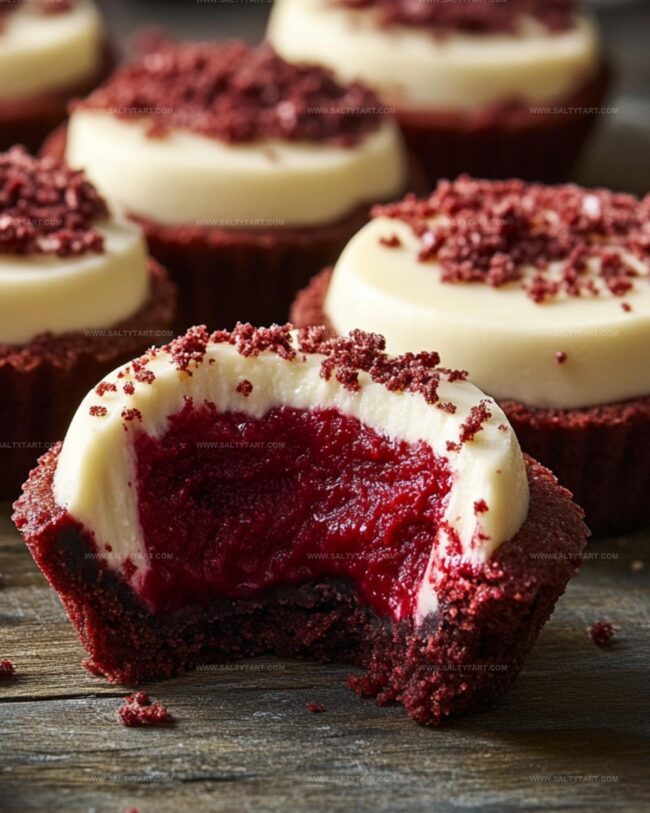
Creamy cheesecake nestles perfectly inside a vibrant red velvet crust that melts in your mouth.
These adorable desserts combine rich chocolate undertones with smooth cream cheese elegance.
Each miniature pie delivers a stunning presentation that sparkles at dinner parties or casual gatherings.
Delicate and indulgent, they promise a delightful flavor explosion with every single bite.
Guests will marvel at these petite treats that blend classic Southern comfort with contemporary dessert artistry.
Prepare to enchant your taste buds with this irresistible confectionery masterpiece.
Red Velvet Cheesecake Mini Pies: What Sets Them Apart
Key Ingredients to Make Red Velvet Cheesecake Mini Pies
Crust Ingredients:Filling Ingredients:Topping Ingredients:How to Prepare Red Velvet Cheesecake Mini Pies
Step 1: Create Delectable Crust
Preheat the oven to 325F. Grab a 12-cup muffin tin and line with cupcake wrappers.
Crush chocolate wafer cookies into fine crumbs. Melt butter and mix thoroughly with cookie crumbs.
Press a tablespoon of the buttery crumb mixture into the bottom of each muffin cup, creating a solid foundation for your mini pies.
Step 2: Whip Up Creamy Filling
Grab a mixing bowl and combine cream cheese with granulated sugar.
Beat until silky smooth. Add vibrant red food coloring and vanilla extract, stirring until you achieve a gorgeous crimson shade.
Crack eggs one by one, blending completely after each addition. Fold in unsweetened cocoa, baking mix, and milk, whisking until the mixture becomes perfectly smooth and free of lumps.
Step 3: Fill and Bake Mini Pies
Carefully pour the luscious filling over the prepared crusts, filling each muffin cup about three-quarters full. Slide the tin into the preheated oven.
Bake for 18-20 minutes until centers are just set and slightly jiggly.
Step 4: Cool and Chill
Remove the mini pies from the oven.
Let them rest in the pan for 10 minutes. Transfer to a wire rack and allow to cool completely.
Refrigerate for at least 2 hours to help them firm up and develop rich flavors.
Step 5: Craft Dreamy Whipped Topping
Select a chilled bowl and pour in heavy cream.
Add powdered sugar and whip until soft, billowy peaks form.
Step 6: Decorate and Serve
Pipe or generously dollop the whipped cream on top of the chilled mini pies.
Sprinkle with delicate chocolate shavings for an elegant finishing touch. Serve and watch everyone’s eyes light up with delight!
Tips When Baking Red Velvet Cheesecake Mini Pies
Ways to Personalize Red Velvet Cheesecake Mini Pies
Foods That Complement Red Velvet Cheesecake Mini Pies
Proper Storage for Red Velvet Cheesecake Mini Pies
FAQs
Look for a set center that jiggles slightly when gently shaken. The edges should be firm, and the top should look slightly dry but not cracked.
Absolutely! Graham crackers or Oreo cookies work great as alternative crust options. Just crush them finely and mix with melted butter.
The cocoa adds a subtle chocolate flavor, while the red food coloring creates the signature red velvet color. They work together to give the classic red velvet taste and appearance.
Print
Red Velvet Cheesecake Mini Pies Recipe
- Total Time: 40 minutes
- Yield: 1 1x
Description
Delightful Red Velvet Cheesecake Mini Pies combine rich chocolate and creamy cheesecake in a perfect petite dessert. Sweet indulgence meets elegant charm, promising pure bliss with each delectable bite you’ll savor.
Ingredients
Main Ingredients:
- 16 ounces (453 grams) cream cheese, softened
- 1/2 cup (100 grams) granulated sugar
- 2 large eggs
- 1/4 cup (60 milliliters) sour cream
- 2 tablespoons unsweetened cocoa powder
- 1 tablespoon red food coloring
- 1 teaspoon vanilla extract
Crust Ingredients:
- 1 1/2 cups (180 grams) graham cracker crumbs
- 3 chocolate wafer cookies, crushed
- 2 tablespoons butter, melted
Finishing Ingredients:
- Whipped cream for topping
- Chocolate shavings for garnish
Instructions
- Preheat the oven to 325°F (163°C) and prepare a 12-cup muffin tin with liners or grease.
- Combine crushed chocolate wafer cookies with melted butter to create a uniform mixture.
- Press approximately 1 tablespoon of cookie mixture into the bottom of each muffin cup, creating an even crust foundation.
- In a large mixing bowl, blend cream cheese and granulated sugar until achieving a smooth, creamy consistency.
- Incorporate vanilla extract and red food coloring, mixing until reaching the desired vibrant red hue.
- Gradually add eggs, beating thoroughly after each addition to ensure complete integration.
- Fold in unsweetened cocoa, baking mix, and milk, stirring until the mixture becomes completely smooth with no lumps.
- Distribute the filling evenly across the prepared crusts, filling each muffin cup approximately 3/4 full.
- Bake for 18-20 minutes, or until the centers appear just set and slightly firm.
- Remove from oven and allow mini pies to cool in the pan for 10 minutes.
- Transfer pies to a wire rack and cool completely.
- Refrigerate for a minimum of 2 hours to achieve a firm, chilled texture.
- Whip heavy cream and powdered sugar in a chilled bowl until soft peaks form.
- Decorate the chilled mini pies by piping or dolloping whipped cream on top.
- Finish by garnishing with delicate chocolate shavings for an elegant presentation.
Notes
- Ensure cream cheese is at room temperature to achieve a smooth, lump-free filling and prevent cracking during baking.
- Gently tap the muffin tin on the counter after filling to release any air bubbles and create a uniform texture.
- For a gluten-free version, substitute chocolate wafer cookies with gluten-free graham crackers or almond flour-based crust.
- Adjust food coloring gradually to achieve the perfect vibrant red velvet color without affecting the taste of the mini pies.
- Prep Time: 20 minutes
- Cook Time: 20 minutes
- Category: Desserts
- Method: Baking
- Cuisine: American
Nutrition
- Serving Size: 1
- Calories: 210 kcal
- Sugar: 12 g
- Sodium: 70 mg
- Fat: 14 g
- Saturated Fat: 8 g
- Unsaturated Fat: 5 g
- Trans Fat: 0.2 g
- Carbohydrates: 20 g
- Fiber: 1 g
- Protein: 2 g
- Cholesterol: 35 mg
Jess Martinez
Contributing Recipe Writer & Nutrition Consultant
Expertise
Southwestern and Latin American cooking, Nutritional analysis and healthy recipe planning, Cultural food traditions, Modifying traditional dishes for better health
Education
Santa Fe Community College
Certificate in Culinary Arts
Focused on mastering the flavors and cooking methods of traditional Southwestern cuisine.
Jess’s love for bold, homegrown flavors led her straight into the world of Southwestern cooking and cultural nutrition.
After completing her Certificate in Culinary Arts at Santa Fe Community College, she made it her mission to show that good-for-you food can still taste incredible.
At saltytart.com, Jess shares vibrant, health-conscious recipes with roots in tradition but a fresh, modern twist. When she’s not testing new recipes, you’ll find her at local growers’ markets, tending her herb garden, or digging into food history books.