
Irresistible Red Velvet Thumbprint Cookies with Cream Cheese Recipe
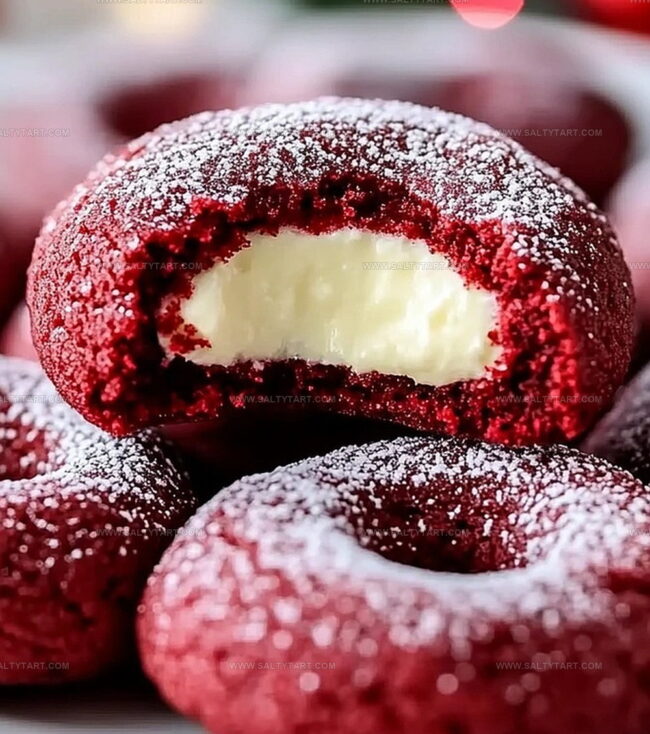
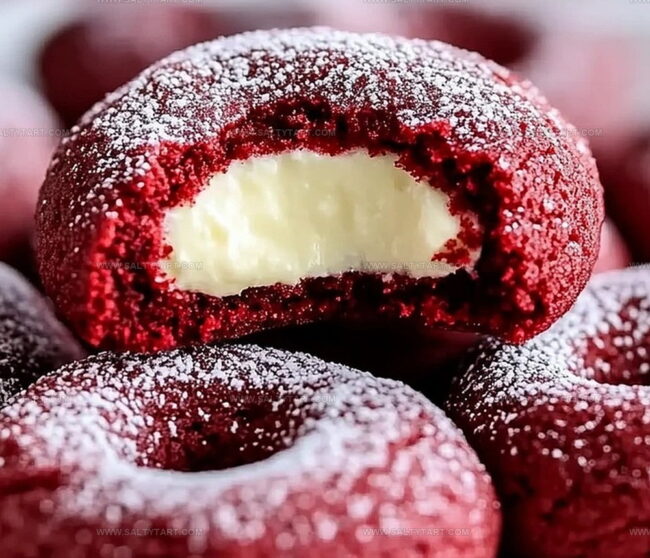
Cookies with a vibrant red velvet thumbprint design instantly capture attention at any gathering.
Soft cocoa-infused dough creates a delightful canvas for creamy filling.
Delicate indentations showcase a luxurious cream cheese center that melts perfectly.
Rich chocolate undertones complement the smooth, tangy cream cheese surprise nestled in each bite.
Baking these treats becomes a delightful adventure you can master quickly.
Elegant yet simple, these cookies promise to impress without complicated techniques.
Make them once, and you’ll find yourself returning to this irresistible recipe time and again.
Red Velvet Thumbprint Cookies With Cream Cheese Filling
Ingredients To Make Red Velvet Thumbprint Cookies
Main Ingredients:Dry Ingredients:Filling and Decoration Ingredients:How To Bake Red Velvet Thumbprint Cookies
Step 1: Whip Up the Base
In a large mixing bowl, blend butter and sugar until the mixture becomes light and airy. Work the ingredients until they create a smooth, creamy texture that looks fluffy and pale.
Step 2: Add Vibrant Color and Flavor
Incorporate the egg, vanilla extract, and red food coloring into the butter mixture. Stir thoroughly until all ingredients are completely integrated and the color is consistent and bright.
Step 3: Create the Dry Mixture
In a separate bowl, combine the following ingredients:Whisk these dry ingredients together until well blended and no lumps remain.
Step 4: Merge Wet and Dry Ingredients
Gradually fold the dry ingredient mixture into the wet ingredients.
Mix gently until just combined, being careful not to overmix the dough.
Step 5: Chill the Dough
Wrap the cookie dough in plastic wrap and refrigerate for at least 30 minutes.
This helps the dough firm up and makes it easier to handle.
Step 6: Prepare for Baking
Preheat the oven to 350°F.
Line a baking sheet with parchment paper. Roll the chilled dough into small balls, then coat each ball in holiday sanding sugar.
Step 7: Create Thumbprint Indentations
Place the sugar-coated dough balls on the baking sheet. Use your thumb or the back of a small spoon to gently press a small indentation into the center of each cookie.
Step 8: Bake to Perfection
Bake the cookies for 10-12 minutes until they are set but still soft. Remove from the oven and, if needed, carefully reshape the thumbprint indentations.
Step 9: Cool the Cookies
Transfer the cookies to a wire rack and let them cool completely. This ensures they will hold their shape and be ready for filling.
Step 10: Craft the Cream Cheese Filling
In a bowl, blend cream cheese, powdered sugar, and vanilla extract until the mixture is smooth and creamy.
Step 11: Fill the Cookies
Once the cookies are totally cooled, carefully spoon or pipe the cream cheese filling into the center indentations.
Step 12: Final Chill and Serve
Refrigerate the completed cookies for 20-30 minutes to help the filling set. Serve and enjoy these delightful red velvet thumbprint treats!
Tips To Nail Red Velvet Thumbprint Cookies
Variations To Try With Red Velvet Thumbprint Cookies
Pairing Ideas To Enjoy With Red Velvet Thumbprint Cookies
The delicate sweetness and light bubbles of a chilled rosé perfectly complement the rich cream cheese and vibrant red velvet flavors.
A bold, dark roast coffee highlights the cocoa powder’s depth, creating a sophisticated dessert experience that balances the cookie’s sweetness.
Warm, spiced mulled wine offers a cozy counterpoint to the cool cream cheese filling, making these cookies an ideal winter treat that warms the soul.
Classic whole milk provides a creamy, smooth backdrop that cuts through the cookie’s richness and cleanses the palate between bites.
Storage Tips To Keep Red Velvet Thumbprint Cookies Fresh
FAQs
The red food coloring provides the signature bright red hue, while cocoa powder adds a subtle chocolate flavor that’s classic to red velvet recipes.
Yes, you can omit the food coloring, but the cookies will look more like chocolate cookies and lose the traditional red velvet appearance.
Gently press the indentation right after removing the cookies from the oven, which helps maintain the shape while the cookies are still warm and soft.
Absolutely! Chilling helps prevent spreading and ensures the cookies maintain their shape, resulting in a more uniform and attractive final product.
Print
Red Velvet Thumbprint Cookies With Cream Cheese Recipe
- Total Time: 57 minutes
- Yield: 24 1x
Description
Indulgent red velvet thumbprint cookies blend luxurious cocoa richness with smooth cream cheese filling, creating a delightful dessert that melts in your mouth. Crimson-hued cookies with elegant cream centers will make you crave sweet moments of pure deliciousness.
Ingredients
Main Ingredients:
- 1/2 cup (113 grams) unsalted butter, softened
- 1 large egg, room temperature
- 1 1/4 cups (156 grams) all-purpose flour
- 4 ounces (113 grams) cream cheese, softened
Flavor and Color Ingredients:
- 3/4 cup (150 grams) granulated sugar
- 1 teaspoon red food coloring
- 2 tablespoons cocoa powder
- 1 teaspoon vanilla extract
Finishing and Binding Ingredients:
- 1/4 teaspoon baking soda
- 1/8 teaspoon salt
- 1/4 cup holiday sanding sugar
- 1/4 cup (30 grams) powdered sugar
- 1/2 teaspoon vanilla extract
Instructions
- Vigorously cream butter and granulated sugar in a large mixing bowl until the mixture becomes airy and pale, creating a fluffy foundation for the cookies.
- Incorporate egg, vanilla extract, and red food coloring, blending thoroughly to achieve a vibrant crimson hue and smooth consistency.
- In a separate bowl, sift together flour, cocoa powder, baking soda, and salt, ensuring no lumps remain. Gradually fold dry ingredients into the wet mixture, stirring gently until just combined.
- Wrap the dough in plastic film and refrigerate for 30 minutes, allowing the ingredients to meld and the dough to firm up for easier handling.
- Preheat oven to 350F (175C). Line a baking sheet with parchment paper. Extract chilled dough and roll into uniform 1-inch spheres, coating each in holiday sanding sugar for a festive sparkle.
- Delicately press a thumb or small spoon into the center of each cookie, creating a well for the cream cheese filling.
- Bake for 10-12 minutes until edges are set but centers remain soft. Remove from oven and gently reinforce thumbprint indentations if needed. Transfer to a wire rack for complete cooling.
- Whip softened cream cheese with powdered sugar and vanilla extract until silky smooth, creating a luscious filling.
- Once cookies have reached room temperature, carefully pipe or spoon cream cheese mixture into the thumbprint cavities.
- Refrigerate cookies for 20-30 minutes to stabilize the filling, then serve and enjoy these decadent red velvet treats.
Notes
- Refrigerate dough for at least 30 minutes to prevent spreading and ensure a perfectly shaped cookie.
- Use gel food coloring for more vibrant red color without altering the cookie’s texture.
- Room temperature ingredients help create a smoother, more consistent dough that blends easily.
- For gluten-free version, substitute all-purpose flour with a 1:1 gluten-free baking blend to maintain cookie’s delicate structure.
- Prep Time: 45 minutes
- Cook Time: 12 minutes
- Category: Desserts, Snacks
- Method: Baking
- Cuisine: American
Nutrition
- Serving Size: 24
- Calories: 112 kcal
- Sugar: 8 g
- Sodium: 45 mg
- Fat: 6 g
- Saturated Fat: 3 g
- Unsaturated Fat: 3 g
- Trans Fat: 0 g
- Carbohydrates: 14 g
- Fiber: 1 g
- Protein: 2 g
- Cholesterol: 18 mg
Mike Reynolds
Founder & Recipe Developer
Expertise
Farm-to-table cuisine, Seasonal recipe development, Sustainable cooking techniques, Food photography
Education
Asheville-Buncombe Technical Community College (A-B Tech)
Associate Degree in Culinary Arts
Mike studied culinary arts with a strong focus on farm-to-table principles and sustainable cooking. His training emphasized the importance of fresh, local ingredients and environmentally responsible practices in the kitchen.
Mike’s food journey began deep in the Blue Ridge Mountains, where weekends at farmers’ markets and home-cooked meals sparked a lifelong obsession with simple, seasonal eating.
After earning his Associate Degree in Culinary Arts from Asheville-Buncombe Technical Community College, he set out to bring farm-to-table cooking into everyday kitchens, without the fuss.
Mike’s philosophy is all about keeping it fresh, unfussy, and full of heart. When he’s not crafting new single-serving recipes, he’s hiking mountain trails, chatting with local farmers, or experimenting with wild ingredients in his backyard kitchen.