
Whimsical Red Velvet Tree Cake Recipe for Sweet Celebrations
Indulge in a decadent red velvet tree cake that promises to be the centerpiece of your holiday dessert spread.
This festive recipe blends rich, velvety chocolate with a vibrant crimson hue that catches every eye.
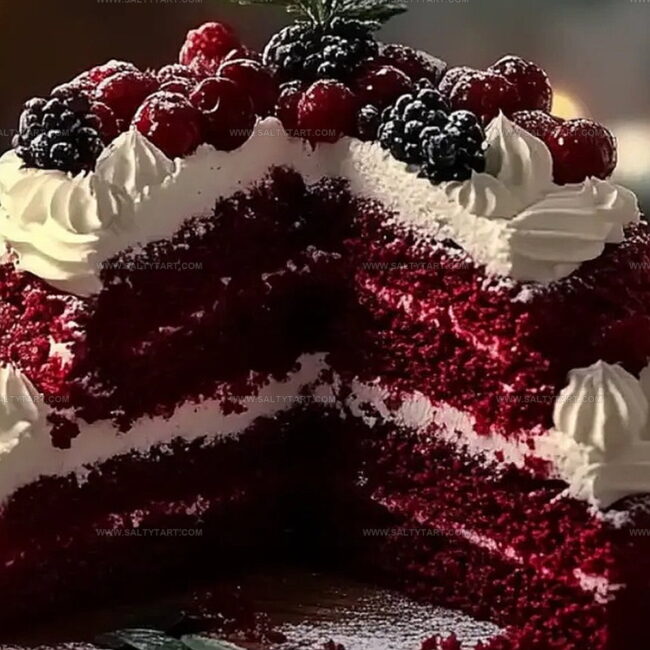
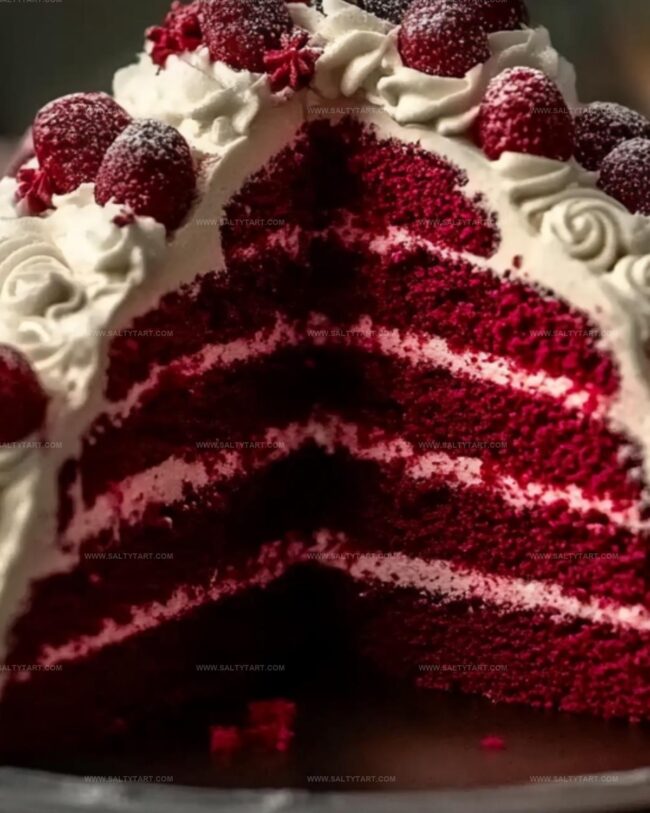
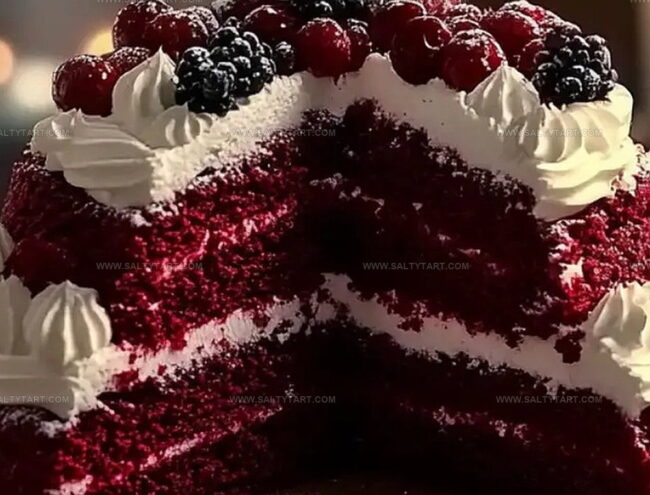
Soft, moist layers are carefully crafted to resemble a whimsical evergreen tree, complete with delicate frosting details.
Cream cheese frosting adds a luxurious touch that perfectly complements the cake deep red color.
Each slice reveals a stunning pattern that looks almost too beautiful to eat.
Bakers of all skill levels can create this showstopping dessert that will become an instant family favorite.
Prepare to wow your guests with this stunning and delicious red velvet tree cake that transforms an ordinary gathering into a memorable celebration.
Why Red Velvet Tree Cake Feels So Festive
Key Ingredients for Red Velvet Tree Cake Recipe
Dry Ingredients:Wet Ingredients:Cake Pan Preparation:How to Bake a Red Velvet Tree Cake
Step 1: Prepare Baking Station
Preheat the oven to 350F. Gather round cake pans in graduated sizes (9-inch, 7-inch, 5-inch, and 3-inch).
Grease the pans thoroughly and line with parchment paper to ensure easy cake removal.
Step 2: Create Dry Ingredient Blend
Sift together the following ingredients in a large mixing bowl:Ensure the dry ingredients are well combined and free of lumps.
Step 3: Mix Wet Ingredients
In a separate bowl, whisk together:Blend until the mixture is smooth and the color is consistent.
Step 4: Combine Ingredients
Gradually pour the wet ingredients into the dry ingredient mixture.
Stir carefully and consistently until the batter becomes smooth and fully incorporated. Be careful not to overmix, as this can make the cake tough.
Step 5: Fill Cake Pans
Divide the batter evenly among the prepared cake pans, filling each about two-thirds full. This allows room for the cakes to rise without overflowing.
Step 6: Bake the Cake Layers
Place the cake pans in the preheated oven. Bake until a toothpick inserted into the center comes out clean.
Typically, this takes about 25-30 minutes, depending on the pan size.
Step 7: Cool and Prepare for Stacking
Remove cakes from the oven and let them cool in the pans for 10 minutes.
Carefully transfer to a wire rack to cool completely. Once cooled, trim the tops to create flat, even layers for stacking.
Notes for Baking Red Velvet Tree Cake Easily
Tasty Twists for Your Red Velvet Tree Cake
Sips and Sweets With Red Velvet Tree Cake
Storing Red Velvet Tree Cake for Fresh Slices
FAQs
The deep red color comes from combining cocoa powder with red food coloring, creating the cake’s signature vibrant appearance.
While it requires multiple cake pan sizes and careful layering, the recipe follows standard cake-making techniques that intermediate bakers can successfully achieve.
Yes, you can replace buttermilk with milk and vinegar, use gel food coloring instead of liquid, and swap vegetable oil with canola oil without significantly impacting the cake’s texture or flavor.
Vinegar reacts with the baking soda to help the cake rise and create a tender, soft crumb, enhancing the cake’s overall texture and lightness.
Print
Red Velvet Tree Cake Recipe
- Total Time: 50 minutes
- Yield: 12 1x
Description
Enchanting red velvet tree cake brings festive holiday magic to dessert tables with its whimsical design. Rich cocoa layers draped in creamy frosting create a delightful centerpiece you’ll cherish making and sharing with loved ones.
Ingredients
Main Cake Ingredients:
- 2 1/2 cups (315g) all-purpose flour
- 1 1/2 cups (300g) granulated sugar
- 1 1/2 cups (360ml) vegetable oil
- 1 cup (240ml) buttermilk
- 2 large eggs
Flavoring and Coloring Ingredients:
- 2 tablespoons (30ml) red food coloring
- 1 teaspoon cocoa powder
- 1 teaspoon vanilla extract
- 1 teaspoon white vinegar
Leavening and Seasoning Ingredients:
- 1 teaspoon baking soda
- 1 teaspoon salt
Instructions
- Calibrate oven to 350°F (175°C) and prepare graduated cake pans by lightly coating with cooking spray and lining with parchment paper to ensure smooth cake release.
- Combine all dry ingredients through a fine-mesh sieve to eliminate potential lumps, creating a uniform base mixture for the cake.
- Whisk liquid components vigorously in a separate vessel, ensuring complete integration of color and emulsification of ingredients.
- Pour wet mixture into dry ingredients, stirring gently with a spatula until batter achieves a silky, uniform consistency without overmixing.
- Distribute batter evenly across decreasing pan sizes, filling each approximately two-thirds full to allow proper rising during baking.
- Position pans in preheated oven, maintaining consistent spacing for balanced heat circulation.
- Bake for 25-30 minutes, rotating midway through cooking process to guarantee even browning and thorough internal cooking.
- Test cake doneness by inserting a slender toothpick into center – it should emerge clean with minimal crumbs.
- Remove cakes from oven and allow to cool completely on wire racks before attempting removal from pans or layering.
Notes
- Achieve a perfect red color by using gel food coloring instead of liquid, which provides more vibrant and concentrated pigmentation without altering batter consistency.
- Create a moist texture by ensuring ingredients are at room temperature, especially eggs and buttermilk, which blend more evenly and produce a smoother cake.
- Prevent cake layers from sticking by using parchment paper rounds and generously greasing pan sides with butter or non-stick spray.
- Adjust sweetness for dietary needs by reducing sugar slightly or substituting with alternative sweeteners like stevia or monk fruit for low-carb variations.
- Prep Time: 20 minutes
- Cook Time: 30 minutes
- Category: Desserts
- Method: Baking
- Cuisine: American
Nutrition
- Serving Size: 12
- Calories: 286 kcal
- Sugar: 20 g
- Sodium: 179 mg
- Fat: 14 g
- Saturated Fat: 2 g
- Unsaturated Fat: 12 g
- Trans Fat: 0 g
- Carbohydrates: 36 g
- Fiber: 1 g
- Protein: 3 g
- Cholesterol: 37 mg
Jess Martinez
Contributing Recipe Writer & Nutrition Consultant
Expertise
Southwestern and Latin American cooking, Nutritional analysis and healthy recipe planning, Cultural food traditions, Modifying traditional dishes for better health
Education
Santa Fe Community College
Certificate in Culinary Arts
Focused on mastering the flavors and cooking methods of traditional Southwestern cuisine.
Jess’s love for bold, homegrown flavors led her straight into the world of Southwestern cooking and cultural nutrition.
After completing her Certificate in Culinary Arts at Santa Fe Community College, she made it her mission to show that good-for-you food can still taste incredible.
At saltytart.com, Jess shares vibrant, health-conscious recipes with roots in tradition but a fresh, modern twist. When she’s not testing new recipes, you’ll find her at local growers’ markets, tending her herb garden, or digging into food history books.